Burnt Toast's Aspire X-QPack Water Cooled Mod Pics

BurntToast

2[H]4U
Joined
Jun 14, 2003
Messages
3,677
Here is my red Aspire X-QPack with a modified Evercool EC-WC-202 Water Cooling Kit. The kit comes with both a 120MM RAD and 80MM RAD, Pump, Res as well as CPU/GPU blocks. The kit normally takes up 1 or 2 5.25" drive bay that house the 120MM RAD, Pump and Res. But I trashed the 5.25" and gutted the parts from it that mattered to me. By doing this I freed up some MUCH needed space from my 5.25" drives.

Now before I move on, I'd like to thank Massive for his thread in which he uses the very same case and water cooling kit. His tips where most useful.

I made a custom shroud which is placed on the back of my case utilizing the 120MM fan and 5.25" bay RAD. It and it works PERFECTLY, is air tight and draws out a LOT of air. The 80MM RAD is mounted in the front of the inside of the case, raised by spacers and 4 screws coming in from the side. Then a hole was drilled in the side of the window to allow cool air into the RAD. The 80MM has two fans that both push and pull. The outtake of this air then moved onto the system ram. The 120MM fan on the other had just pulls the air through the RAD and out the back.

As far as look go all things are UV, the inside of the case has been painted by UV reactive paint (1.25 cans), I placed three UV LEDS into the stock PSU, changed the two front panel LEDs for the HDD and Power both to red, cut a window out in my DVD drive and I installed grommets for the rear 120MM fan to reduce vibration.

BTW due to space I'm using the privided 420Watt PSU. So far so goo, but the 12+V is at 12.6 which is way too freakin high for me! I hope to soon replace it.
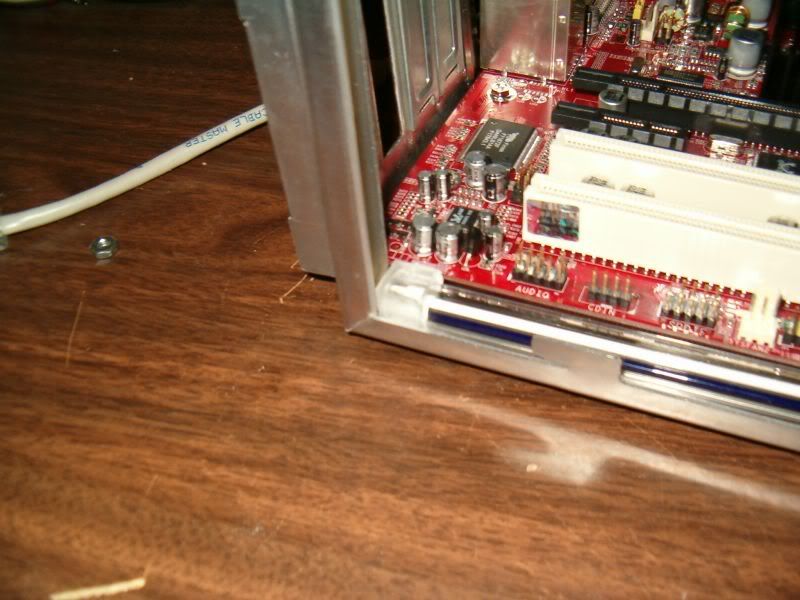
Clearance is not even 1MM :p!!
kfc_lanmaniac_quakecon_case_01.jpg

kfc_lanmaniac_quakecon_case_02.jpg

kfc_lanmaniac_quakecon_case_03.jpg

kfc_lanmaniac_quakecon_case_04.jpg

kfc_lanmaniac_quakecon_case_05.jpg

kfc_lanmaniac_quakecon_case_06.jpg

kfc_lanmaniac_quakecon_case_07.jpg

kfc_lanmaniac_quakecon_case_08.jpg

kfc_lanmaniac_quakecon_case_09.jpg

kfc_lanmaniac_quakecon_case_10.jpg


If you cant undertsand me then please LMK. It's 4AM and I have been awake on 1.5HRS of sleep att day while at LANfest2K5 :p

Later!
 
Good work, I really like the lighting effect...............just some tips:

Turn your power supply over...........it looks like you have enough clearance to do so. Your power supply is going to have a hard time getting good cooling since you don't have much clearance from the top of the cover. It will also help to cool your video card (although you're using the GPU block, your video RAM could still use some airflow over it), as well as decreasing your card's overall ambient temps.

You can grind down the plastic block on your cold cathode on the left side using a bench grinder or dremel so it will fit in the channel:

CCLgrounddown.jpg


I like your 120mm shroud.................what did you make it out of? You can probably shorten the length though and give you more working room for your hard drive.
 
Yeah I may shorten the shroud. But as it is it’s the exact length of my PSU which makes it look cleaner. But I sure could use the extra room, so I'm sure that I will get to that one of these days.

As far as the CC shortening idea I'll be sure to try that out. But its more of the 80MM ran/fan being in the way then anything else. I guess I can always remove the RAD, install the CC and then reinstall the RAD. It’s just with this day case there is a certain order of installation. And without ever doing it before, you won’t know what to install first. It’s like a puzzle.

And the PSU is flipped just for the eye candy. But yeah I should flip it over since the heat is pretty high coming out of the PSU.

And last... the shroud is a 4x4" hobby box :p It fits PERFECTLY!!! The holes line up for the 120MM fan, all you need to do it cut out the squad for the RAD. I cut it slightly narrower than the RAD so that I get the best performance. The where the fan meets the should I used silicon as well as 4 screws to keep it air tight. And dam does that fan pump out air from the RAD! It’s just too bad that the pump doesn’t work as hard :/

Oh btw you can pick up a 4x3 hobby box or even a 4x2 if you look hard enough. Or just cut down the 4x4 :p
 
Aren't we all... :)

I am working on my qpack, I broke the DFI motherboard thing a few days ago so I am waiting for that one and then I should be well on my way. I think watercooling is the way to go with the qpack!
 
the aspire x-qpack competition. Everyone is trying to pimp their x-qpack to the max. Who will be the winner?
 
Hey burnttoast, you can fit 12'' cold cathodes in there? On one side its fitted fine but on the other its slanted... did you do that on purpose or did it not fit? I wanna get some UVs in mine.
 
toxikneedle said:
Hey burnttoast, you can fit 12'' cold cathodes in there? On one side its fitted fine but on the other its slanted... did you do that on purpose or did it not fit? I wanna get some UVs in mine.

The left hand side (PCI slot side) is tight because the mobo tray rides right up against the rail. I had to grind down my square block mount with a bench grinder to get clearance.
 
You think I should just get a couple of 4'' cold cathodes and put em on the side of the optical drive rack and stuff. I just wanna get some UV so the cables light up.
 
I kind of like the stealthed look where you can see the light from your CCs but not the CCs themselves.
 
MassiveOverkill said:
The left hand side (PCI slot side) is tight because the mobo tray rides right up against the rail. I had to grind down my square block mount with a bench grinder to get clearance.
So if I just get 1 12'' cc and put it on the right hand side, i should have no problem installing it?
 
I just cut down my shroud to 2", replaced the POS 420watt PSU that came with the case with a too larger pcp&c 410watt PSU and am in the works on making a custom shell for the case. The stock door/shell is okay, but looks too generic. So Ill see if I can fab something out that will look better.

Overall the case is fine. But its a LOT of work making a water cooling setup fit with the case fully loaded. That is if you care for making it look clean.

Ill some more updated pics soon.
 
In the past few days I put a little more work and thought into my mod. Even though it is not 100% done (more like 80-90% for all I know) it still looks pretty bad ass I-M-O.

Like most cases with neons blinging it out, pictures (or at least my shitty camera) doesn’t serve it justice. But all in all GG and I now have cancer.

  • Now to give you an update of what I did over the past few days…

    1) Sized down the shroud, repainted it.

    2) Created a plexi shell/doors for my case

    3) Sand blasted/Etched my plexi shell

    4) (crappy mod) install two 50mm fans in front of my hard drives. They have no air source, but it’s better than nothing for right now.

    5) (crappy mod) cut out the stock fan grill, put in a basic 120mm fan grill.

    6) (crappy mod) tried to see if I could create a plexi shell for my psu. Didn’t look possible if I wanted it clean, so I may come back to it. For now the roof is off.

    7) Cut two fan holes in the plexi with a (I think) a 3” hole saw.

    8) Install 80mm low profile fan over the cpu block.

    9) FIXED CROOKED FAN GRILL!!! (Psst… originally the radiator is crooked and that was my guide. There for grill was crooked.)

    10) All of the loose cabling is now in the second 5.25 bay. Took some time but omfg it fit!

    11) Installed my quakecon 400GB hard drive. Will be returned to frys after the pwnij! 

    12) I think that’s it :?

NOW WITH THE ONSLAUGHT!!!


LANmaniac_kfc_casemod_01.jpg

LANmaniac_kfc_casemod_02.jpg

LANmaniac_kfc_casemod_03.jpg

LANmaniac_kfc_casemod_04.jpg

LANmaniac_kfc_casemod_05.jpg

LANmaniac_kfc_casemod_06.jpg

LANmaniac_kfc_casemod_07.jpg

LANmaniac_kfc_casemod_08.jpg

LANmaniac_kfc_casemod_09.jpg

LANmaniac_kfc_casemod_10.jpg

LANmaniac_kfc_casemod_11.jpg

LANmaniac_kfc_casemod_12.jpg

LANmaniac_kfc_casemod_13.jpg

LANmaniac_kfc_casemod_14.jpg

LANmaniac_kfc_casemod_15.jpg

LANmaniac_kfc_casemod_16.jpg

LANmaniac_kfc_casemod_17.jpg

LANmaniac_kfc_casemod_18.jpg

LANmaniac_kfc_casemod_19.jpg
 
Pretty sweet!!!. How did you bend the plexi for your cover? The cover looks pretty professional looking.

My rig is almost finished. I should be getting my Fortron today, so once she's in I'll take some final pictures.
 
Holy crap! Awesome job burnttoast...

Now if there were any good mATX s939 mobos I would totally go with that case! I guess I'll just have to settle for my SN25P :)
 
Very nice job, BurntToast!! I love the custom plexi shell. Excellent work. I hope my QPack mod looks half as good when it's done.
 
Nakamori said:
Sweet, but this thing looks like a brick. How much does it weigh in at?

Scale says 20lbs. But it can be off by as much as -5lbs. So 20-25lbs.

But it sure beat my Chieftec tower! That dude was 60-70lbs depending on the amount of hard drives I had loaded in its belly!
 
*Cough*numberofharddrives,notammount*cough*. I'm feeling pedantic because I have been on hold for three hours.

I am quite impressed with your work. It inspires me to. . .spend money on some WC shit.
 
Here is a question I recived in a PM. I thought that I might as well make it public to help some of you guys out.

qadsan said:
Hi. I really enjoyed the pictures you posted of your Qpack. Nice work!

What did you use for masking the plexi-glass while etching it?

Did you use actual sand, walnut or glass beads while etching it?

How did you join the plexi-glass together? Did you simply butt the square ends together or cut them at 45's or make some type of specia joint, etc? From the pics you posted, it sure looks good the way you did it!

What kind of temperatures are you seeing from your Qpack?

Thanks you for your time and for posting your pictures. I'm hoping to build a Qpack and would like to personalize it a bit. I had been planning to make a clear case, but the idea of etching it for further customization is really kool.

Best Wishes,

Gary

BurntToast said:
I used fine silica for the blasting.

I bent the plexi with a heat gun and used the metal edge of my table saw to bend it.

I masked the plexi with blue painters tape.

Temps are okay. About the same as it was with the stock shell on the case.

I hope this helps.
 
Quote from PM:
How did you get teh plexi to fit into the grooves at the bottom of the case.
- I didnt. Where the grooves are, I drilled a hole through the plexe and into the groove/brackets. There are two screws on each side, 4 total that keep the shell on.

What tools would one need to cut the plexi?
- Table saw. It's the BEST tool for an absolute straight line.

Also, how did you get the frosty look?
- Sand blasting with fine/med silica sand.
 
Gr8 mods!

Do you have some closeup pics for the 12mm shroud?
How's the noise level?

Thanks!
 
Back
Top