HPR-4 Flame'D

nice work so far! i would have busted out with the fiber glass by now, but you seem to be able to work some wonders with body filler :D
 
Mortixer said:
nice mod so far but i woulda done somethin cooler with the base flames
everyones bashing on the base flames but I gotta say, sometimes the flashy approach isnt the best approach and I think that applies here.
 
agreed.. very cool and nice attention to details.. i really like the rounded edge look of the flames
 
Really nice!
I like Front Panel # 2, with the added side vents over Panel # 1.

I'm not a big fan of flames either, but the time you spent on your makes them look like they were always a part of the case! NICE WORK! ;)
 
gee bus. nice mod so far, love your bondo-stuff work :cool:

the black knight always triumphs!
 
While this mod is not going to be a HP3-MRGA when it comes to lighting effects ,i still wanted to add something new.

What i decided upon was a very simple yet modular design that would allow me (with the use of LED lit fans) to swap lighting around to suit the case. A blue fan id used for now but a RED, GREEN ,UV etc can easily be added to the carridge.

I wanted to add lighting that would add to the blowhole/turbine effect, but not distract too much from air flow.

A qik trip to the local plex shop and i was home with the parts needed :)

The major part of this next mod are the 2x 50mm long Perspex tubes , the outer is 100mm and the inner being 80mm.

The modular part of the mod is an old fan holder from a HP server. I will be altering slightily to suit this mod.

PICT0211.jpg


PICT0212.jpg


Shown here is the cutting away ow the middle area to allow the nosecone to come thru,

In the end i removed all the round grill bits and just left the 4 support posts.

PICT0215.jpg


The next shot pretty much gives you the idea of what im after!

PICT0220.jpg


The plex tubes are taken inside for a qick sanding

PICT0230.jpg


Dried and cleaned

PICT0232.jpg


To help the new paint stick the "inners" of the plex tubes are coated with plastic plex prime.

PICT0234.jpg


The the "insides only" are painted with Platinum silver.

PICT0237.jpg
 
Once the paint has dried the ends of each tube are given a qick sand to remove the overspray.

Then these are glued to the also previously painted and dried fan ex holder.

IMG_2227.jpg


IMG_2225.jpg


IMG_2226.jpg


IMG_2228.jpg


IMG_2233.jpg


For testing i'm going to use a spare CM BLUE 120, this type of fan is totally perfect for this mod! the 4 placed LED's that are already on the fan will carry along the tubes perfecty.

Rubber gromets are used to support the fan, the fan is then bolted to the assembly.

IMG_2238.jpg


IMG_2239.jpg


IMG_2242.jpg


IMG_2240.jpg


The assembly now works as one unit and can be installed and removed as needed.

PICT0248.jpg


PICT0249.jpg
 
Next is to test the lighting to ensure the light will actually travel along the tubes to the outer rim.

PICT0300.jpg


It does! and as can be seen buy holding the light unit different angles can produce different effects :)

PICT0295.jpg


PICT0301.jpg


PICT0299.jpg


Next to "SLOT" the unit over the blow hole.... the unit is a nice tight fit! and i doubt that it would easily slip off...but a permanent bracket will be attatched later.

IMG_2248.jpg


IMG_2247.jpg


IMG_2250.jpg


Lighting will also be added to the side vents soon!

PICT0269.jpg


PICT0273.jpg
 
that is why i like your mods. you make these things which make everyone else go "why didn't *i* think of that??" your mods are inspiring :cool:

i like the light tube a lot.

the black knight always triumphs!
 
Looking freaking great!

What are you doing for buttons? Why not use a bulgin vandal proof switch? They look great.
 
Damnit, now youve done it. You have just taken this mod to a new level with your fan. Damnit. Now you just really need to get a big cone for that fan for a turbine effect.
 
Damn it Defyant I just cant get over how good you are I cant wait for the day that you try to work on a nice stock case.
 
thanx guys for the great replies :)

A qick play with some RED EL wire to see how the "Red-look" looks!

I think the blue has a cleaner look and will prolly stick with it for now.... altho i'd still like to play with some PURPLE light for someting different.

PICT0024.jpg


PICT0035.jpg


The next pic really moves along and also shows the base now painted silver! the process is the same as any painting but i'll show it for the sake of the worklog.

PICT0014.jpg


After the panel is "high filled" and left to sit for a few day to allow the dozens of coats of highfill to sink back :p it is then "Black shadow'd" or guide coated, the idea is that the dusty black guid coat is your guide for the sanding or wetrubbing process.

If theres something on TV i'll sand in the laundry sink :) this allows me wet rub and watch the nightly news.

PICT0043.jpg


Once wet rubbed using 800grit wet and dry the panel is taken back out to the workshop , wiped dry, tack clothed or propsoled and given a dusty coat of "Platinum Silver" then followed by several more coats.

IMG_2277.jpg


IMG_2279.jpg


IMG_2284.jpg


The panel is allowed to sit for a bit and then given 5-6 coats of CLEAR and left to sit for 2 days.

IMG_2289.jpg


While the shine looks pretty good! this is a can paint job! and does need to be chopped and buffed.

IMG_2292.jpg
 
Again 800 wet and dry is used for the chopping.

The idea is to get your clear coat flat! as you can see in this one small area after a quiky rub the clear is NOT FLAT!

IMG_2293.jpg


IMG_2295.jpg


A bit more rubbing! now its flat.... its flat when its dull.

IMG_2298.jpg


A good long hand buff using some ultra fine compound and we have have some shine back.

IMG_2306.jpg


IMG_2310.jpg


The same with the base

IMG_2319.jpg


I like the silver so far, alot more cutting and buffing is needed,.

IMG_2327.jpg
 
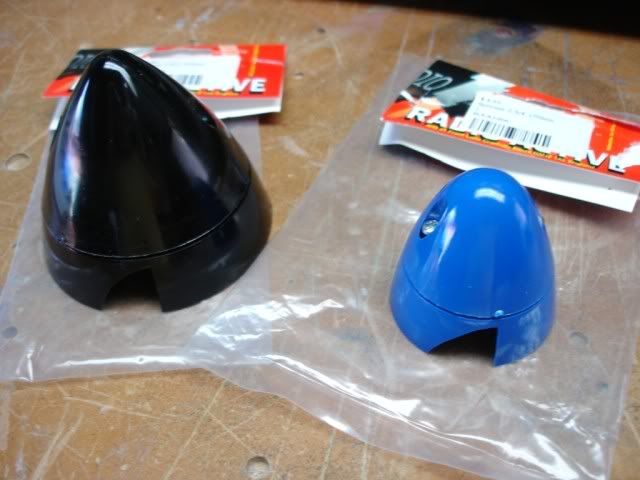
A small update today! i'm still toying with the front blowhole/fan combo as this will be the main feature of the mod. the choice of spinner will be a combo LARGER then normal spinner and some plex modding :)

For the mod i'll be using the LARGE spinner on the left! instead of the smaller one to the right that i normally use for mods.

DSC02339.jpg


Next step is to pick a fan! i wanted to use a chrome fan... the only chome fan i had was a dead one :( so a bit of FAN surgery was needed.

IMG_2330.jpg


The motor in this fan had burnt out, rather than wait a few days to buy a new one i decided to swap the prop onto a new frame.
Pulling these things aprt is as simple as removing one plastic surclip on the back.

IMG_2332.jpg


IMG_2333.jpg


IMG_2336.jpg


The same is done to a cheeper black frame.

IMG_2337.jpg


The new silver prop is slotted onto the new plastic frame, clip is pressed back on, excess oil is wiped away and the rubber plug replaced with some tape to keep it in place.

IMG_2343.jpg


IMG_2344.jpg


IMG_2356.jpg


IMG_2357.jpg


IMG_2358.jpg


IMG_2360.jpg
 
With the minor surgery out of the way i can now get on with the mod :)

to add to another lighting feature to the turbine mod a clear sloped routed adaptor ring is made.

IMG_2362.jpg


The idea is this will not only become a light feature bit will be the adaptor for the larger cone.

IMG_2363.jpg


The ring is machined routed perfectly to suit the base of the cone.

IMG_2364.jpg


Using Weldon the Cone and Ring are centered and glued to the fan.

IMG_2365.jpg


IMG_2366.jpg


The best way to test that the cone is sitting center the fan is switched on :)

IMG_2367.jpg


IMG_2368.jpg


I really like the clean open look of this and a test in the blow hole shows that either with or without the glow rings the mod looks good.


IMG_2379.jpg


IMG_2380.jpg
 
Next is to show how the adaptor plex ring lights up the base of the cone.

IMG_2369.jpg


IMG_2382.jpg


IMG_2383.jpg


A qick fit up to the case for a looksee

IMG_2435.jpg


IMG_2436.jpg


i think thisis a really clean look! and actually prefer the open look to the rings.

IMG_2440.jpg


Speaking of rings! ive added them in also for a looksee :)


IMG_2400.jpg


The base ring gets a bit lost in the effect one the lighting is added but still added to the mod.

IMG_2421.jpg


IMG_2422.jpg


The light being given off is pretty intence

IMG_2446.jpg
 
Hey those rings were damn nice but with the size of the cone on that fan i think you have done right to remove them :D Loving the silver I was wondering what color you would use.
 
Ive never personally liked the way turbines looked (Im weird!) but this one turned out well. Those rings are interesting to say the least.
 
I really wish I had a garage or decent work area to do my modding. I do all of my painting in a small storage shed, all of my cutting on my back porch, and anything thats not too messy right here in the floor of my room... haha. I need to move out and get my own place with a garage!
 
I always enjoy watching your mods develop, great job and I look forward to future updates!
 
Thanx for the replys guys!

Its time to some real modding :)

I procrastenated for days over wether to paint the chassis in 2pack or get it powder coated...

In the end i had a better idea!


A qik trip to my favourite place to pick up some pre-cut plex!


The plan was to buy some SILVER coloured plex....unfortunatly they don't stock a metalic silver... i had to improvise!!!

IMG_2485.jpg


Crack the chassis open

IMG_2487.jpg


abit of metal work

IMG_2489.jpg


With the tab gone the back wall is flat and i can line it with plex sheeting.

IMG_2493.jpg


IMG_2495.jpg


The new back wall can be slid in.

IMG_2499.jpg


a new base or floor panel is added

IMG_2500.jpg


The back of the case is fitted back on and the motherboard is placed in for marking.

IMG_2509.jpg


This mod will also have a motherbord cover! so a clear piece is used to transfer markings.

IMG_2512.jpg
 
A cover is bentup to fit over the HDD bays

IMG_2514.jpg


IMG_2516.jpg


IMG_2519.jpg


IMG_2520.jpg


IMG_2523.jpg


The motherbord cover is marked and cut.

IMG_2556.jpg


And fit tested.

IMG_2565.jpg


The new panels are all taken out again and preped for and painted~

Because i could not buy silver plex the idea is to paint the back of the plex this will give the same effect as if the plex was silver.

IMG_2632.jpg


IMG_2634.jpg


For the silver im using cheep can enamel.

IMG_2636.jpg


The painted panels are slid back into the partly painted chassis and the back of the case is pop rivoted back on.

IMG_2639.jpg


IMG_2671.jpg


Paper peeled off and board is place in.

IMG_2676.jpg
 
With the motherboard in place it was time to work on the new style motherboard cover.

To keep in theme with the mod ive decided to add some contrast flames! the choice was to you cut plex flames, a soft yet classy aqua blue plex was opted for.


IMG_2567.jpg


IMG_2640.jpg


The edges are given a light sand

IMG_2641.jpg


And then flame polished for a gloss shine.

IMG_2643.jpg


@ Hex head bolts will be used to attach the flames, the original thought was to glue these one! but i plan on making a second set in smoked and have 2 sets for interchangable or overlayed flames!

IMG_2644.jpg


Some mesh is glued onto the back for the north bridge

IMG_2684.jpg


To hold the motherboard in place the old brass post is used.

IMG_2689.jpg


IMG_2691.jpg


IMG_2695.jpg
 
At this point i need to move onto the PSU cover!

Again the original thought was to powdercoat chrome or paint the psu! i didnt want to goto the extreme of making a plex psu as i had done with hp3 so i thought a matching cover would be the way to go!


As i will show later, i needed a specific psu for this mod,

IMG_2476.jpg


the pic of psu's wasnt the best of the bunch but it was the configuration for this mod.

IMG_2479.jpg


The cover is basic in idea and design, so ive decided to add some fins!


i'd decided that the gold grill wouldnt work with all the silver in this mod, so some scrap hex mesh was added.

IMG_2544.jpg


IMG_2547.jpg


Next is to glue the cover togther.

IMG_2540.jpg


IMG_2550.jpg


IMG_2551.jpg


IMG_2553.jpg


IMG_2554.jpg
 
The next step as with the other panels is to paint the inside of the psu cover.

IMG_2621.jpg


IMG_2622.jpg


The cover is plain! So to add some shape ive had 5mm strips cut in smoked plex.

IMG_2658.jpg


These will be cut evenely placed and glued.

IMG_2649.jpg


IMG_2650.jpg


IMG_2651.jpg


IMG_2652.jpg


IMG_2653.jpg


Some extra glue is added for strenght.

IMG_2655.jpg
 
Back
Top