Infact mate, i'd say take a trip over to the data storage section and ask them.
Navigation
Install the app
How to install the app on iOS
Follow along with the video below to see how to install our site as a web app on your home screen.
Note: This feature may not be available in some browsers.
More options
You are using an out of date browser. It may not display this or other websites correctly.
You should upgrade or use an alternative browser.
You should upgrade or use an alternative browser.
phinix nanoTower - Smallest and most powerful mITX rig !
- Thread starter phinix
- Start date
phinix
Gawd
- Joined
- Dec 13, 2005
- Messages
- 884
Wooo designs!!!Lookin' goood!
Quick question, went back to the starting post and noticed you're not having games on a RAID-0 SSD. Striping on SSD doesn't really show that much of a performance increase unless you're laoding/using relatively large amounts of data, e.g. games, moving media data etc. Having a stripe boot partition isn't going to see you much more performance than just one on it's own, one SSD with TRIM for OS is damn quick anyway
Also, mega photobucket failure going on back there lol
Photobucket pisses me off!
I opened third account now to make sure that 10GB a month will eb fine People love my build I guess...Well, I had OS on single SSD and on two stripped and have to say there is huge difference between actually. It loads quicker and software response is better. I even had 3 in RAID0 but didn't see much difference, biggest is between one and two. True, some games take advantage of it, I keep few on SSDs actually, like Crysis, FarCry2, or now Sabotuer. I may change it in some point in the future to one 60GB of OS and second one for games. Right now I'm flashed, all money went on this build
Photobucket pisses me off!
Well, I had OS on single SSD and on two stripped and have to say there is huge difference between actually. It loads quicker and software response is better. I even had 3 in RAID0 but didn't see much difference, biggest is between one and two. True, some games take advantage of it, I keep few on SSDs actually, like Crysis, FarCry2, or now Sabotuer. I may change it in some point in the future to one 60GB of OS and second one for games. Right now I'm flashed, all money went on this build
Ah cool so you've had experience yourself, that good then
Good to know, though apparently depends if they're TRIM supported drives or not. If you stripe 2 TRIM supported drives you lose the TRIM function.Yeah you could always keep what you've got and then replace the games drive with a 160Gb SSD, or replace them all and go SATAIII 6G. At some point that is when you've stopped throwing money at building pretty alu/acrylic boxes
phinix
Gawd
- Joined
- Dec 13, 2005
- Messages
- 884
Here's the right side panel. This one has bigger window to show graphic card. ALso, chaotic hex shape edges to add some dramatic character to the panel


What do you guys think?
What do you guys think?
phinix
Gawd
- Joined
- Dec 13, 2005
- Messages
- 884
I couldn't help myself... had to try it out on the Tower.... Don't mind the colors, I only tried them out to make some contrast for outside cover panels...


phinix
Gawd
- Joined
- Dec 13, 2005
- Messages
- 884
Damn i cant wait till you have it finish!!! If it looks anything like what you have mocked up there its going to be SICK!!!
The renderings look great, now show us the real deal!
Thanks guys
I know I wish I had time (and money) to build it right away, but I need to wait till weekend to make another update.
phinix
Gawd
- Joined
- Dec 13, 2005
- Messages
- 884
Yuummmmyyy
I know, I know, I love it too
So that will be the design I'm gonna make. Well, I may add some small changes, like add holes for USB ports and audio out on the left side fo the left panel. Also power button needs a place so it may end up on the left panel. Still don't know where I'm going to install fan controller. Thing is with this small design there is no space outside for those items...
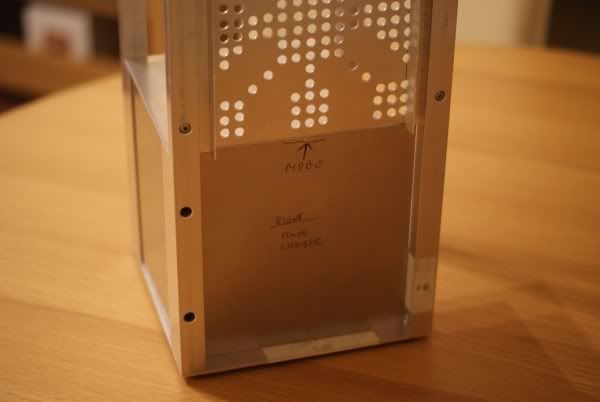
I worked a bit last weekend, I cut the bottom part of the mobo tray to make space for power chamber front panel right under the mobo. Also I cut out that square in top panel for fan exaust and access to cables in I/O mobo panel. Trimmed those L shape alu prifiles that were installed under mobo tray - there were sticking out a bit to the front of the case priventing front panel installation, so had to trim them both about 5mm. Another thing was cut small holes for H50 barbs - I cut out fan hole in middle panel but left it without holes for pre-installed H50 babrs and tubing Now its ready for that radiator installation. Yep, I think that was all. Also bought another 20x30mm L shape profile - I will use it to mount power chamber. I know all thos wrods won't exactly show what I did, but didn't have time to make photos of those parts. Will do it tomorrow.
Now, guys - I bought today a small tapping kit, but this time it is different, not like the one I had. Old one was pain to use cause threading bit was unstable and I failed all my attempts.
This time I bought different kind - the one that looks like Draper one.
Old one is like this:
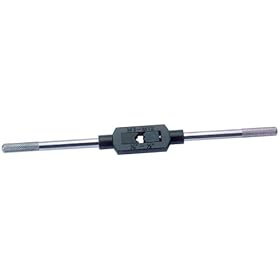
New one is exactly like this kit:

Now, please give me all tips, instructions and kind of ideas how to tap aluminium. Please help me out here cause I need to tap main alu rods to mount outside panels. This is the only way I can mount them, cause when the whole hardware will be installed I won't have access to internal sides of those rods, so cannot use regular nuts etc...
Please share your wisdow.. how to thread holes. I will be using M4 screws, so what size of drill bit I need to use to drill holes for that tapper bit, how to do it right?
Last time I tried with old kit I basically ruined the thread somehow.. ripped it off and ended up with clean holes
nlancaster
Gawd
- Joined
- Feb 24, 2005
- Messages
- 700
For tapping aluminum get some of this
http://www.tools-plus.com/tap-magic...um=feed&utm_source=froogle&utm_term=TAP30004P
1. Clean the tap. Tooth brushes work great.
2. Few drops of Tap magic in the hole.
3. Gently get the tap started in the hole.
4. 1/2 turn in.
5. 1/4 turn back.
6. Repeat steps 4 and 5 until done tapping.
It is slow but steady and will keep you from breaking the tap or getting it stuck. It is also a good idea when possible to do a thru hole tap. Meaning the starter hole goes all the way thru the part, this keeps the tap from getting jammed in the hole also.
As far as Drill size goes. I am in the USA so we tend not to use metric. But if you know that the major Diameter of the screw is 4mm, in this case, then you would probably use a 3.5mm or 3mm drill bit.
Practice on some scrap utnil you get it right, then you wont mess up your case.
Photobucket pisses me off!
rent your own server instead
way esier to work with via ftp my trafic pr. month is about 30 gb xDyour design is wicked cruel man! love the honeycomb pattern, and the general scheme. you should have used all black wires for the extenders though:/ you can see a little trough the sleeving
oh, and remember, warranty is overrated
chop that psu up!edit:
this should come in handy for you

størrelse på skrue/andet der skal bruges = size on bolt to be used
størrelse på hul som bruges til gevindbor = size of hole to be drilled before tapping
phinix
Gawd
- Joined
- Dec 13, 2005
- Messages
- 884
Thanks mate!
Hmm.. I just found this - look slike pretty cool gadget - I could plug two SSDs and use only one SATA port on mobo, that would give me one more SATA!
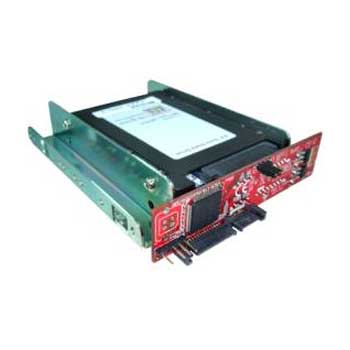
Hmm.. I just found this - look slike pretty cool gadget - I could plug two SSDs and use only one SATA port on mobo, that would give me one more SATA!
phinix
Gawd
- Joined
- Dec 13, 2005
- Messages
- 884
Im confuuuuseed. Would that not half the bandwidth if you're planning on RAID-0?
RAID 0 doubles it. For example, my two Vertex drives gives me 415/250 MB/s - read/write, compared to single 230/135 MB/s. It is almost x2.
phinix
Gawd
- Joined
- Dec 13, 2005
- Messages
- 884
I meant if you use that gadget you'll be limiting 2 drives to use jsut one port on the motherboard?
Sorry, not sure what you mean, one SATA channel will give be fine for two raid 0 I think...
Kaldskryke
[H]ard|Gawd
- Joined
- Aug 1, 2004
- Messages
- 1,346
Sorry, not sure what you mean, one SATA channel will give be fine for two raid 0 I think...
Not really, no. SATA 2.0 runs at 3Gb/s, which is 375MB/s. SATA 2.0 uses 8b/10b encoding, so that cuts the maximum throughput of a single SATA 2.0 link to 300MB/s. You'd definitely notice the cap on your sequential read speeds, and your sequential write speeds might be slightly affected too.
phinix
Gawd
- Joined
- Dec 13, 2005
- Messages
- 884
Not really, no. SATA 2.0 runs at 3Gb/s, which is 375MB/s. SATA 2.0 uses 8b/10b encoding, so that cuts the maximum throughput of a single SATA 2.0 link to 300MB/s. You'd definitely notice the cap on your sequential read speeds, and your sequential write speeds might be slightly affected too.
Well.. in this case its better solution for SATA 3.0 then...
phinix
Gawd
- Joined
- Dec 13, 2005
- Messages
- 884
Now.. time for UPDATE !!!!!!!!!!!!!!!!! YAY!!!
Maybe not much, but it took me a lot of work and time to do those small things...
First of all, power chamber. I made 3 of 4 panels for this thing. Also made two main L shape profiles which will be holding left panel (one below the left window).
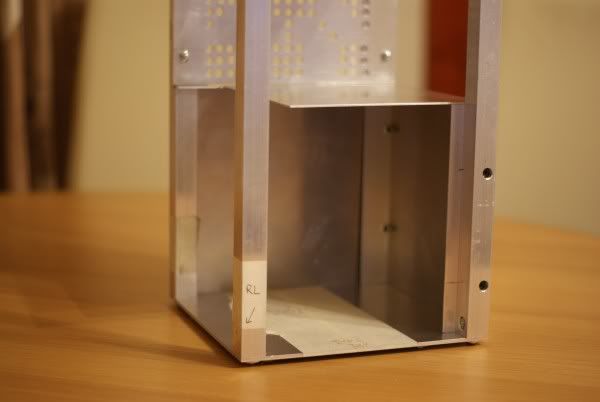
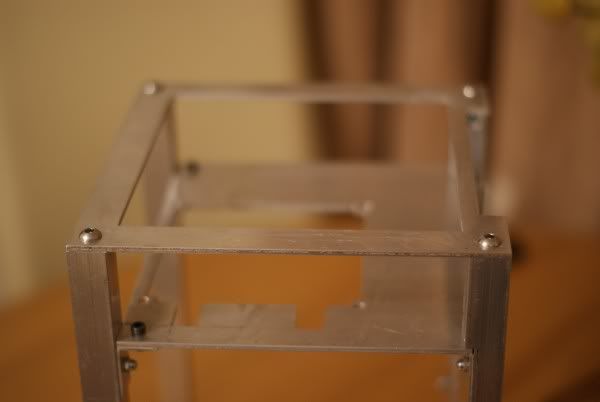
On the photo below you can see this left panel. Its not attached yet, it will be mounted to those two L profiles on both sides with rivets. You can see those profiles inside as well. These are already mounted - I drilled small holes for M4 screws and bigger, 8mm holes in them to the middle of the alu rod to hide screw heads. Each L shape profile is attached with two screws. It is steady as rock
On some of the photos you may notice that I also "trimmed" those L shape profiles behind the mobo tray - they are only trimmed, not filed or sanded yet, so they look ugly, but I had to leave them for now cause wanted to make that power cahmber panels. They will be finished this weekened.
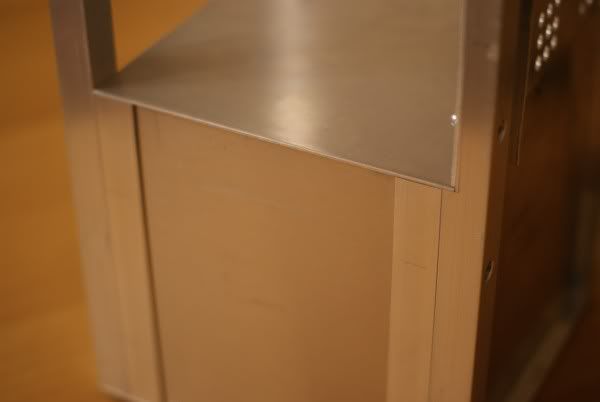
Here's one of the sides - you can see I used black head cap screws I got from Bill to mount them.
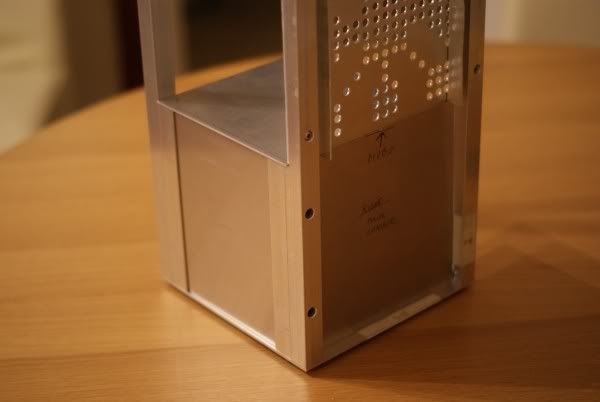
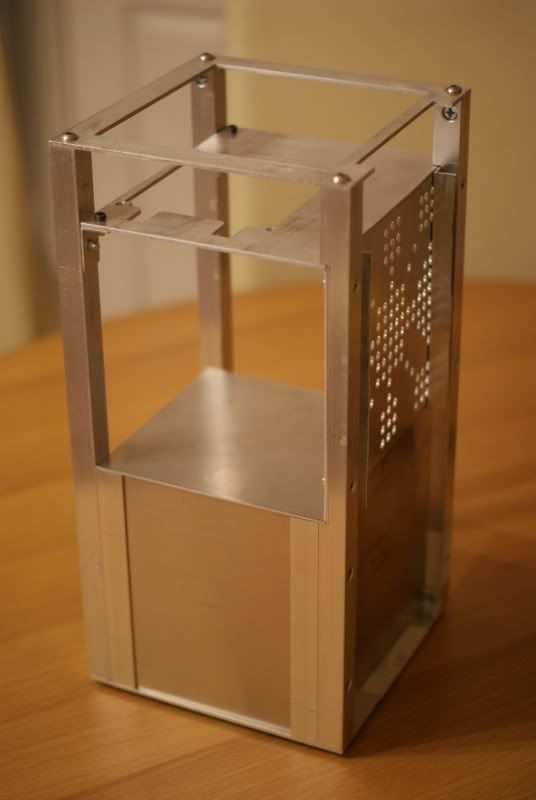
On photo below you can see front panel which is just put there, its not attached yet. I need to fabricate some L shape profiles for it on the bottom.
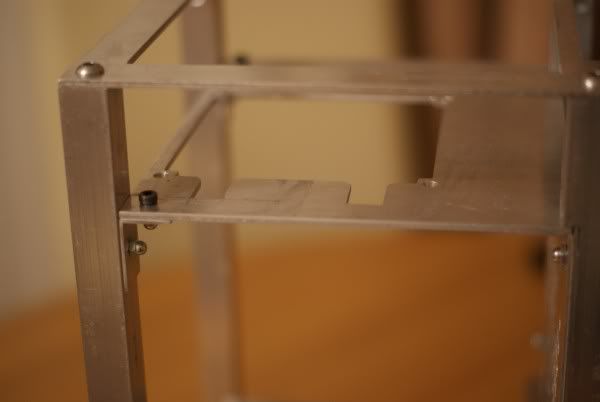
Also what I did and what can be seen here is I cut out that rectangle bit from the mobo tray in order to fit this power chamber panel below it. Idea of all thos panels is to hide all cables and mess and make it look all clean and tidy. Power chamber will contain the PSU and water pump.
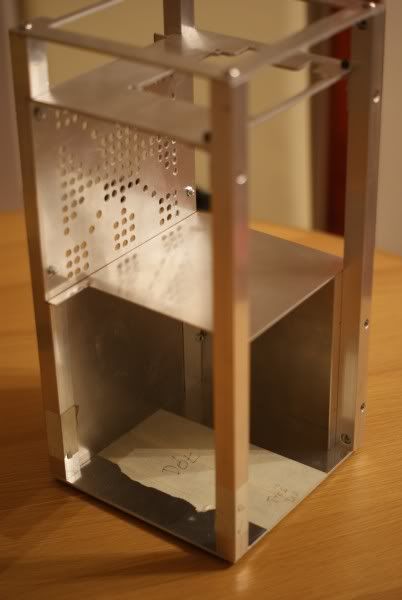
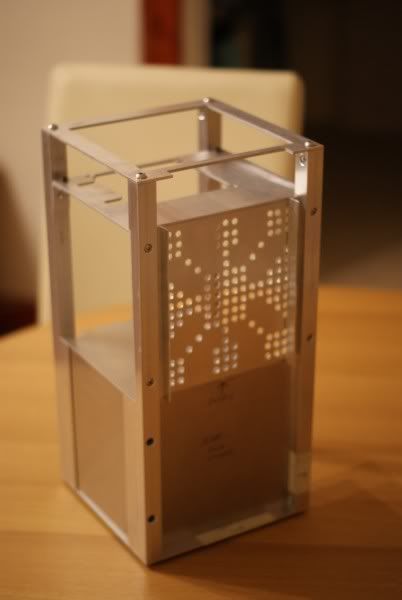
And here you see top panel for the chamber. You can see it won't cover the whole bottom of the case, cause I need space for graphic card on one of the sides.... But, to route it to through the whole case I left small "tongue" on the left so it gets in that small space below mobo tray (its 8mm wide, but very important to keep the whole structure steady).
Better look on the top panel... from the top
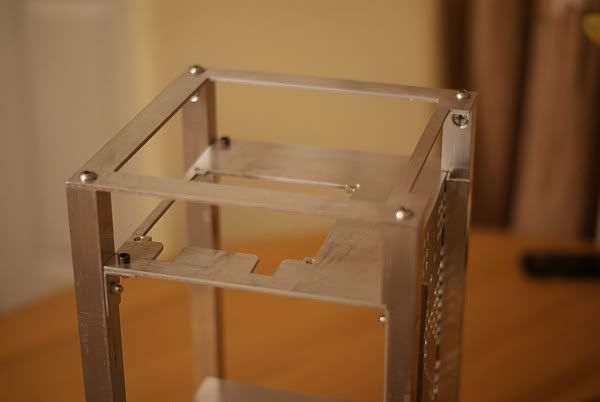
Now, two other BIG things I made lately: top panel has now huge square hole in it!
Yep, that will be necessery for H50 fan exhaust and access to cables plugged to the mobo
Of course you also can see that small, 13mm deep gap on the front - that is for dvd that will go up to the main top acrylic panel...
Last, but not least - my favourite - I finished the hole for H50 cooler - you can see the fan hole is cut out. The beauty part are those small holes for tubing.. I love them I actually filed those sharp corners, so tubing won't be even scratched during the mounting...
So, that would be it for now. I'm leaving you with two last shots of my little beauty
Maybe not much, but it took me a lot of work and time to do those small things...
First of all, power chamber. I made 3 of 4 panels for this thing. Also made two main L shape profiles which will be holding left panel (one below the left window).
On the photo below you can see this left panel. Its not attached yet, it will be mounted to those two L profiles on both sides with rivets. You can see those profiles inside as well. These are already mounted - I drilled small holes for M4 screws and bigger, 8mm holes in them to the middle of the alu rod to hide screw heads. Each L shape profile is attached with two screws. It is steady as rock
On some of the photos you may notice that I also "trimmed" those L shape profiles behind the mobo tray - they are only trimmed, not filed or sanded yet, so they look ugly, but I had to leave them for now cause wanted to make that power cahmber panels. They will be finished this weekened.
Here's one of the sides - you can see I used black head cap screws I got from Bill to mount them.
On photo below you can see front panel which is just put there, its not attached yet. I need to fabricate some L shape profiles for it on the bottom.
Also what I did and what can be seen here is I cut out that rectangle bit from the mobo tray in order to fit this power chamber panel below it. Idea of all thos panels is to hide all cables and mess and make it look all clean and tidy. Power chamber will contain the PSU and water pump.
And here you see top panel for the chamber. You can see it won't cover the whole bottom of the case, cause I need space for graphic card on one of the sides.... But, to route it to through the whole case I left small "tongue" on the left so it gets in that small space below mobo tray (its 8mm wide, but very important to keep the whole structure steady).
Better look on the top panel... from the top
Now, two other BIG things I made lately: top panel has now huge square hole in it!
Yep, that will be necessery for H50 fan exhaust and access to cables plugged to the mobo
Of course you also can see that small, 13mm deep gap on the front - that is for dvd that will go up to the main top acrylic panel...
Last, but not least - my favourite - I finished the hole for H50 cooler - you can see the fan hole is cut out. The beauty part are those small holes for tubing.. I love them
I actually filed those sharp corners, so tubing won't be even scratched during the mounting...
So, that would be it for now. I'm leaving you with two last shots of my little beauty
phinix
Gawd
- Joined
- Dec 13, 2005
- Messages
- 884
Thanks!
phinix
Gawd
- Joined
- Dec 13, 2005
- Messages
- 884
Here's the right panel design, updated. I didn't like that small piece sticking out at the bottom part, so cut that out. Now, this is the final version, which will be fabricated.

FrEaKy
[H] Movie and TV Show Review Guy
- Joined
- Jan 31, 2003
- Messages
- 14,114
MAH GAWD!
I will purchase one of those please!
I will purchase one of those please!
phinix
Gawd
- Joined
- Dec 13, 2005
- Messages
- 884
MAH GAWD!
I will purchase one of those please!
This one is prototype.. for now
TH@TGUYUKNO
Limp Gawd
- Joined
- Jan 22, 2010
- Messages
- 153
Not really, no. SATA 2.0 runs at 3Gb/s, which is 375MB/s. SATA 2.0 uses 8b/10b encoding, so that cuts the maximum throughput of a single SATA 2.0 link to 300MB/s. You'd definitely notice the cap on your sequential read speeds, and your sequential write speeds might be slightly affected too.
Not only that, but you are highly unlikely to get even close to full benefit of SSD Raid 0 with the motherboard raid controller, you will most likely see about 300 MB/s max, to get more you would need a dedicated raid card using a PCI-e 4x or 8x connection. Now that said 300 MB/s is by no means slow, but the preforemance would scale better with a dedicated raid solution, rather than onboard.
phinix
Gawd
- Joined
- Dec 13, 2005
- Messages
- 884
Wait.. I'm getting more than 400MB/s with onboard raid....
phinix
Gawd
- Joined
- Dec 13, 2005
- Messages
- 884
I have been playing with top panel design today, this is what I got right now.
Just a small teaser

Just a small teaser
phinix
Gawd
- Joined
- Dec 13, 2005
- Messages
- 884
Here's a small render of that, easier to see what is what

FrEaKy
[H] Movie and TV Show Review Guy
- Joined
- Jan 31, 2003
- Messages
- 14,114
Common man, the suspense is KILLING all of us, moar pix!
phinix
Gawd
- Joined
- Dec 13, 2005
- Messages
- 884
haha Outside panels will be ready next week. This weekend I will be working on power chamber, need to finish it this weekend. I have cut all walls of it, now need to figer out how I'm going to put it all together.
There are few small things that need to be done, but they take load of time...
So be patient my friend.. be patient
Outside panels will be ready next week. This weekend I will be working on power chamber, need to finish it this weekend. I have cut all walls of it, now need to figer out how I'm going to put it all together.There are few small things that need to be done, but they take load of time...
So be patient my friend.. be patient
phinix
Gawd
- Joined
- Dec 13, 2005
- Messages
- 884
Here's the latest sketchup of it, on top of the Tower. Looks ok, I'm sure it will look beautiful in real life with yellow ring switch, yellow leds lighting it up from the inside through that mesh in the middle...
Sketches always look a bit sintetic, fat for me... But its still useful to see it before you actually cut it out from material

Sketches always look a bit sintetic, fat for me... But its still useful to see it before you actually cut it out from material
Kaldskryke
[H]ard|Gawd
- Joined
- Aug 1, 2004
- Messages
- 1,346
I can't wait to see the real system either
This might be one of the largest reasons why I want GF100 to come out sooner, hehe.
phinix
Gawd
- Joined
- Dec 13, 2005
- Messages
- 884
Thanks guys!
Guys, how about this top panel design? Its more like side panels, with those asimetrical window holes...
I'm hasitating

Guys, how about this top panel design? Its more like side panels, with those asimetrical window holes...
I'm hasitating
nlancaster
Gawd
- Joined
- Feb 24, 2005
- Messages
- 700
asymmetric is better. looks like it goes with the side panels better.
phinix
Gawd
- Joined
- Dec 13, 2005
- Messages
- 884
Yep, that is final version, no more changes in top panel