Navigation
Install the app
How to install the app on iOS
Follow along with the video below to see how to install our site as a web app on your home screen.
Note: This feature may not be available in some browsers.
More options
You are using an out of date browser. It may not display this or other websites correctly.
You should upgrade or use an alternative browser.
You should upgrade or use an alternative browser.
Project: Feeding Frenzy
- Thread starter Top Nurse
- Start date
- Status
- Not open for further replies.
Made another trip to the Art Supply Warehouse today and cornered the resident paint specialist about all this. Came back with some very pure thinner to thin out the Jurek Top Coat a bit (Grumbacher Odorless Thinner) and new daVinci series 112 synthetic brush (coincidently made in Germany) so will try this out tomorrow. Also was told that prep was everything when putting clear on anything so I was advised to scrub the part with alcohol (just happen to have some 99.9% pure Isopropyl alcohol I use in making a special blend for cleaning my astronomical optics). So after doing some more lapping to get a nice clean non-oxidized surface I will try tomorrow...again.
 If this doesn't work I am giving it up as a lost cause and just bite the bullet and forget the whole thing. Hopefully I will have something good to report about this tomorrow.
On another note you might have noticed a gigantic push-fit bulkhead fitting in my fitting box a few posts back. I had originally planned to use it for another wiring job but it ended up being to big for what I wanted. Then I got a PM from Grumblemarc today and started thinking more about it and decided that it would really work great for an ATX power loom. So thanks guy for the good thought! I took the collets out, cut it with a hacksaw to size, drilled out the center part, and it is being used to run my ATX power loom through the midfloor.
On another note you might have noticed a gigantic push-fit bulkhead fitting in my fitting box a few posts back. I had originally planned to use it for another wiring job but it ended up being to big for what I wanted. Then I got a PM from Grumblemarc today and started thinking more about it and decided that it would really work great for an ATX power loom. So thanks guy for the good thought! I took the collets out, cut it with a hacksaw to size, drilled out the center part, and it is being used to run my ATX power loom through the midfloor.
grumblemarc
n00b
- Joined
- Apr 3, 2004
- Messages
- 55
Glad to be of inspiration.
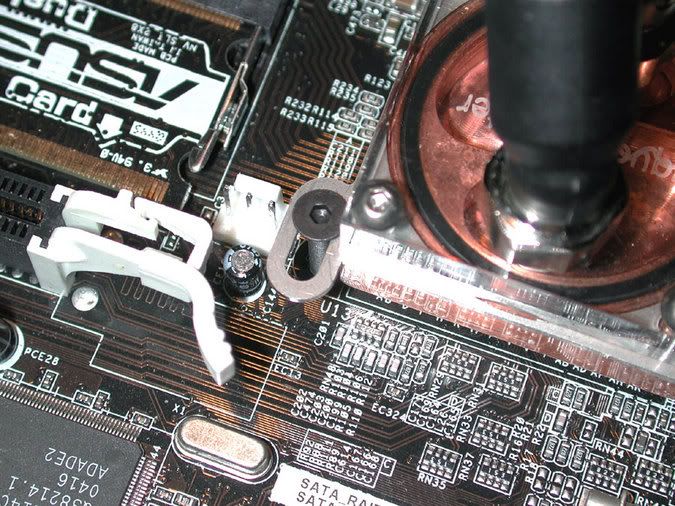
Have you had that problem mounting a TwinPlex with the factory screws where the block moves around easily due to the small diameter of the screw in the slot of the mounting screen? This really bugged me so I tried many a different solution. The winner was by using a M3 x 20mm flat head socket cap screw and a nylon flat washer under a 3mm nut on the back side of the board. The flat head design makes it so there is no wiggle room in the mounting screen and it looks a lot cooler than those round head zinc plated screws AC supplies. Got lucky and found the screw and nut in black. 
Just wanted to mention that if anyone decides to use a 3mm screw on the A8N SLI board they will have to open up the NB holes. Very carefully hand drill it. The other option is to get a 3mm tap and just thread the NB holes. Either way works, but do be really careful.
Also decided I didn't like the way I had the rad in the middle compartment as one was metal and one was black. So paint it!
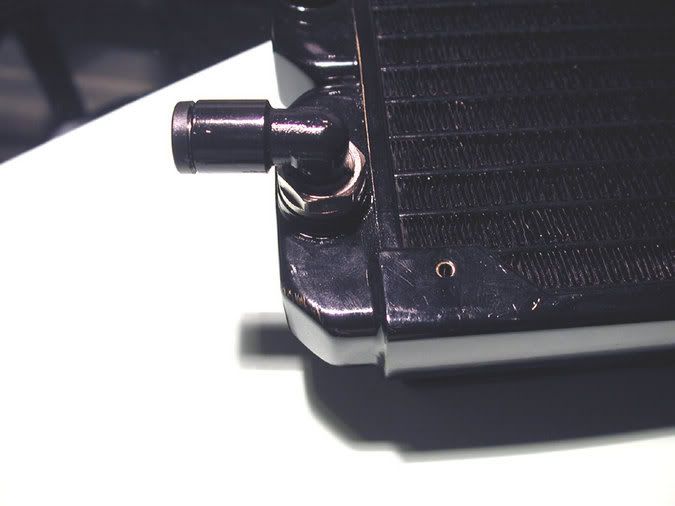
Decided to paint some other fittings too. Here is my 6mm bulkhead fitting I got from McMaster-Carr. Came 100% nickel plated so I decided that a little black might look nice here as well.
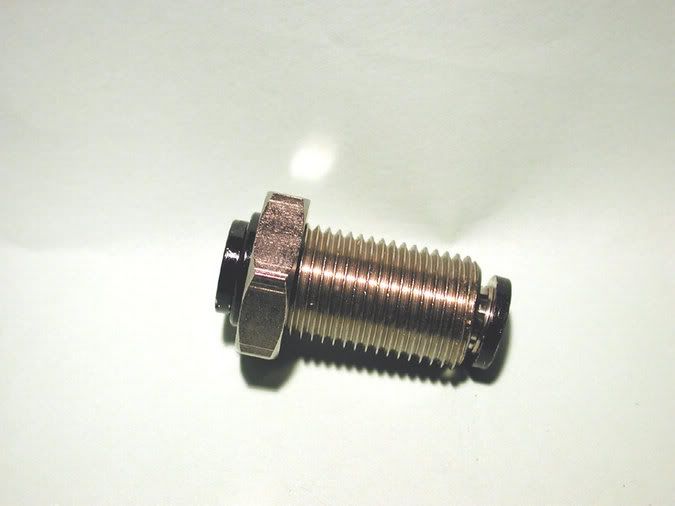
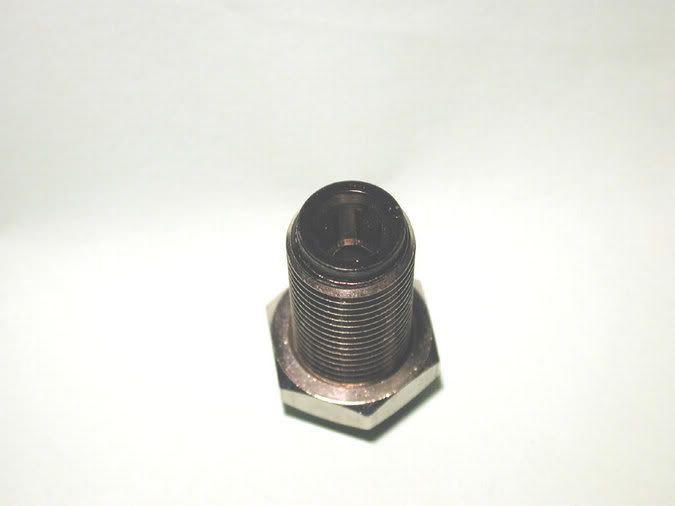
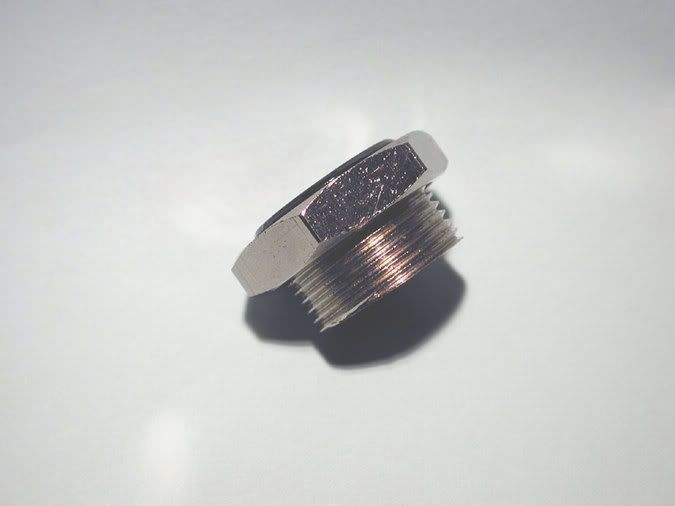
A ways back you saw that gigantic fitting in my fittings box? That was a 3/8" bulkhead I also got from McMaster-Carr. Well I took out the tube holding collets and cut it in half with a hacksaw. This turned it into a nice little bulkhead fitting to run my ATX power loom through the case bulkhead floor. Painted \the inside and both ends and it will be ready to go in the case once the paint dries and I can add a second coat.
Side view:
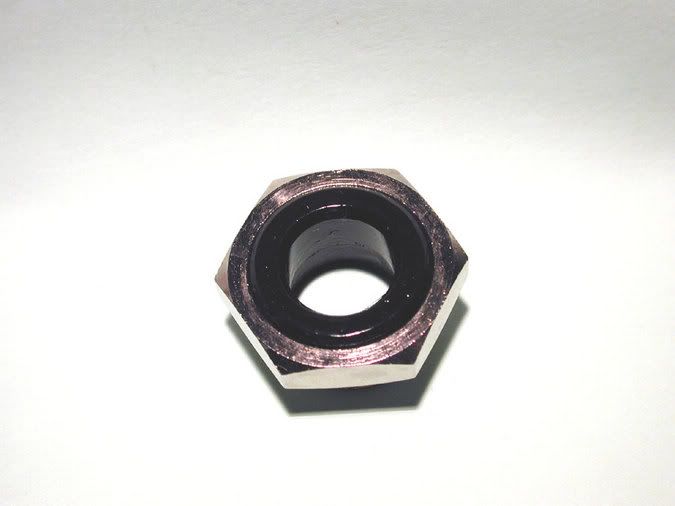
Top view:
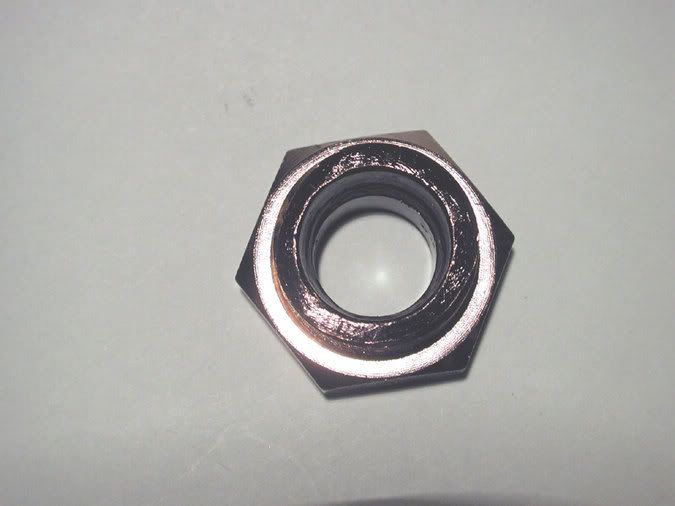
Bottom view:
Just wanted to mention that if anyone decides to use a 3mm screw on the A8N SLI board they will have to open up the NB holes. Very carefully hand drill it. The other option is to get a 3mm tap and just thread the NB holes. Either way works, but do be really careful.
Also decided I didn't like the way I had the rad in the middle compartment as one was metal and one was black. So paint it!
Decided to paint some other fittings too. Here is my 6mm bulkhead fitting I got from McMaster-Carr. Came 100% nickel plated so I decided that a little black might look nice here as well.
A ways back you saw that gigantic fitting in my fittings box? That was a 3/8" bulkhead I also got from McMaster-Carr. Well I took out the tube holding collets and cut it in half with a hacksaw. This turned it into a nice little bulkhead fitting to run my ATX power loom through the case bulkhead floor. Painted \the inside and both ends and it will be ready to go in the case once the paint dries and I can add a second coat.
Side view:
Top view:
Bottom view:
CrimandEvil
Dick with a heart of gold
- Joined
- Oct 22, 2003
- Messages
- 19,670
Mind asking what order number those bulkheads were? I'm thinking of ordering a few.
CrimandEvil said:Mind asking what order number those bulkheads were? I'm thinking of ordering a few.
The large fitting is for a 1/2" OD tube size and it is part number 51495K256. The smaller fitting is for an 8mm OD tube size. Both items can be found on page 145 of the McMaster-Carr online catalog.

revlimit said:TN - do you know if the Vandal Resistant Illuminated Switch is a replacement of the original switch?
The Bulgin sawitch is a drop in replacement of the Lian-Li switch in that there is no drilling needed. However, you will have to solder the terminals yourself. Also the "red" Bulgin has to have a 67 ohm resistor in series with the LED or you will let the magic smoke out of it. The blue and green versions are okay to use with the MB LED headers.
thanks again, I just brought the V2000B and it planning on getting the blue switch. I'm also thinking of talking all the rivets out to get the motherboard tray and 5.25" bay painted black. Did you replace the rivets with hex bolts? If so, was size were they. I'm planning on replacing all the rivets with hex bolts from Mcmaster. I appreciate all the help you can provide.
R@Mo said:I can't believe I'd been outta the loop for this long! It's amazing how much effort you put into the tiny little details. Looking forward to seeing what else you come up with!
Thanks for the nice words
I didn't start out planning this much detail, but one thing led to another. Now I am lapping the AC grill that I had cut to fit on the back of my case. The sides of the grill are almost done and have a mirror finish to them. Now I am working on the front of the grill. With all the countless assemby and disassembly I got a few scratches on the grill face. Sooo since I had to sand it down to get the scratches out I decided a mirror finish wouldn't be that much more difficult. revlimit said:thanks again, I just brought the V2000B and it planning on getting the blue switch. I'm also thinking of talking all the rivets out to get the motherboard tray and 5.25" bay painted black. Did you replace the rivets with hex bolts? If so, was size were they. I'm planning on replacing all the rivets with hex bolts from Mcmaster. I appreciate all the help you can provide.
Didn't get that crazy...yet.
But I was thinking of doing it to get the parts, you want to paint, anodized. IIRC a 1/8" or 7/64" drill works pretty well for getting the rivets out. Drill into the side that has the dimple as it makes a perfect center. What you want is to get the top off the rivet and then you can just pop the rivet out.Top Nurse said:Didn't get that crazy...yet.
Do you know the size of the hex bolt replacement?
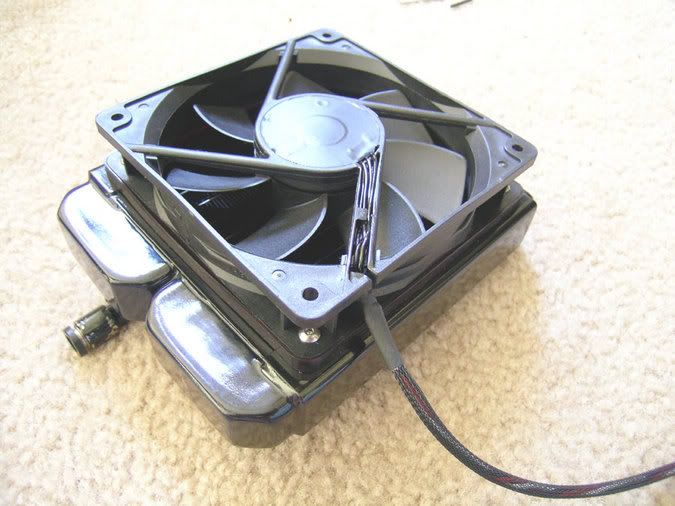
Got a little more work done. Finished up on my radiator/fan sub-assembly. The back radiator fan cable has a long way to go to the front of the case where the Aquaero sits. The cable is about 5 feet long as it has to go the long way around.
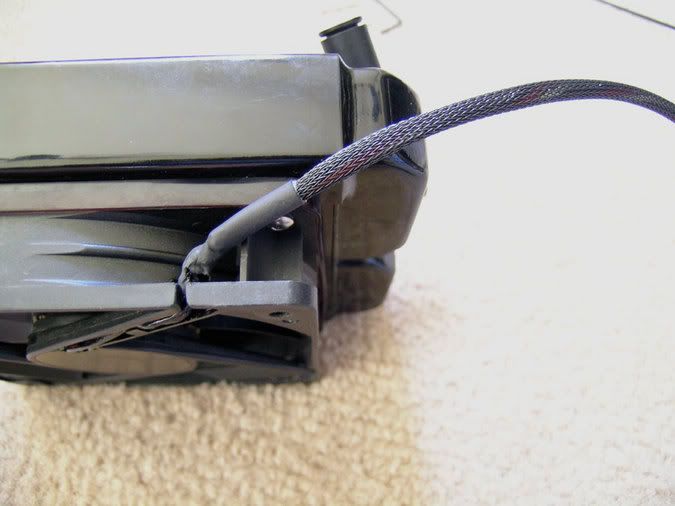
You might not notice it, but their is a Vantec 120mm fan gasket between the radiator and the fan. Suitably dyed in black of course.
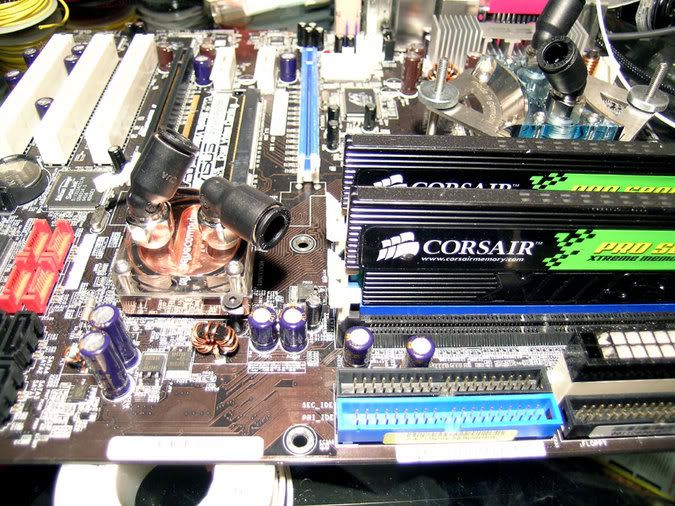
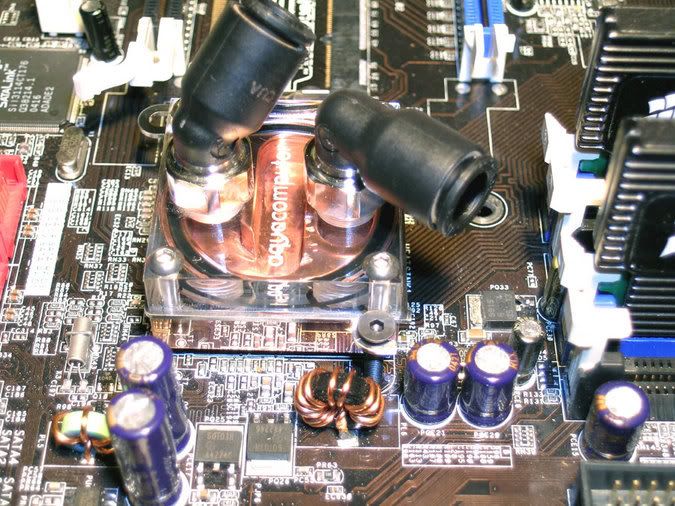
Finally decided to give up on getting some clear acrylic on the side of my waterblocks. It just was to much trouble. So here it is with some special English wax on it (hot tip from my guy who details my car). I guess we will see in a few months how well this holds up. As you can see I spent some time getting a very nice *bling* finish on the outside surfaces. It was finished up with 3,000 grit and the bottom I did to about 2,000 grit. Used Ceramique to mount and checked the imprint and it was perfect. I ditched the Aqua Computer fittings in favor of Legris fittings as they have a nicer look and bigger holes (more flow).
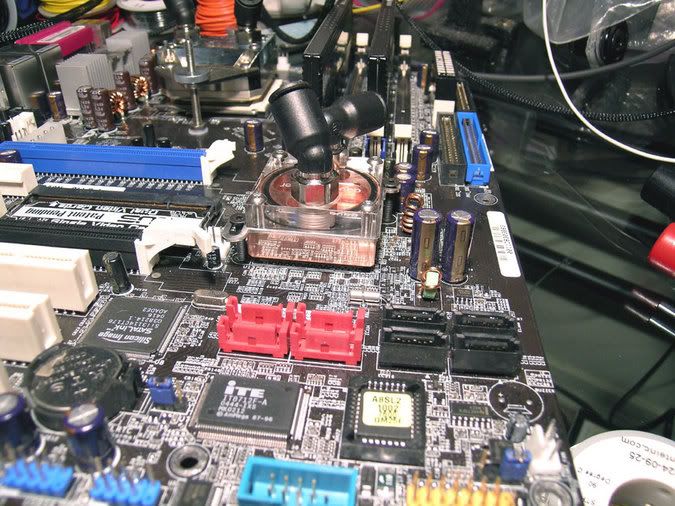
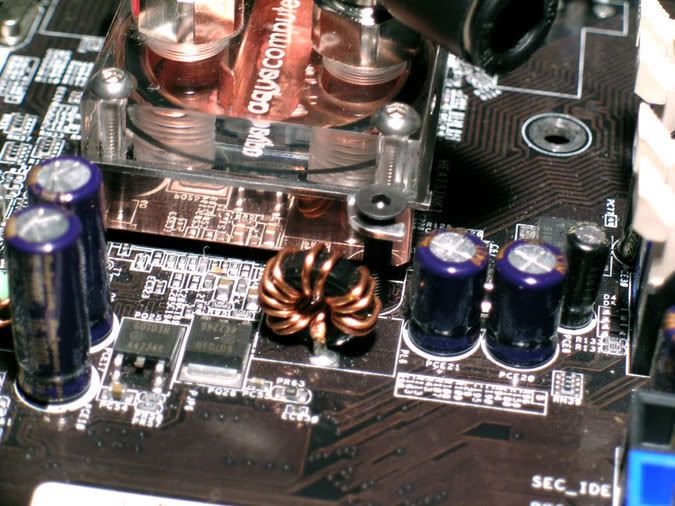
The original plan was for the NB return line to go inbetween the ram modules, but after thinking a while I realized that wouldn't work well if I were to ever go with a full sized video card. SO now it goes inbetween the ram and the ATX MB power loom.
Notice the nice finish on the Twinplex mounting screen? Well the sandpaper was there so I decided it couldn't hurt to polish it up a bit. As you have probably noticed I am on a mission from God to replace all the AC screws with stainless steel buttonhead socket cap screws. In fact if this case has a screw it will probably have a buttonhead. Had to buy a pack of 100 each from McMaster-Carr so I figure why not.
Tomorrow I will be mounting the back radiator grill and routing the wires up to the Aquaero. Also hope to finish up on the SLI power and 4 pin MB power connector looms as well.
You might not notice it, but their is a Vantec 120mm fan gasket between the radiator and the fan. Suitably dyed in black of course.
Finally decided to give up on getting some clear acrylic on the side of my waterblocks. It just was to much trouble. So here it is with some special English wax on it (hot tip from my guy who details my car). I guess we will see in a few months how well this holds up. As you can see I spent some time getting a very nice *bling* finish on the outside surfaces. It was finished up with 3,000 grit and the bottom I did to about 2,000 grit. Used Ceramique to mount and checked the imprint and it was perfect. I ditched the Aqua Computer fittings in favor of Legris fittings as they have a nicer look and bigger holes (more flow).
The original plan was for the NB return line to go inbetween the ram modules, but after thinking a while I realized that wouldn't work well if I were to ever go with a full sized video card. SO now it goes inbetween the ram and the ATX MB power loom.
Notice the nice finish on the Twinplex mounting screen? Well the sandpaper was there so I decided it couldn't hurt to polish it up a bit. As you have probably noticed I am on a mission from God to replace all the AC screws with stainless steel buttonhead socket cap screws. In fact if this case has a screw it will probably have a buttonhead. Had to buy a pack of 100 each from McMaster-Carr so I figure why not.
Tomorrow I will be mounting the back radiator grill and routing the wires up to the Aquaero. Also hope to finish up on the SLI power and 4 pin MB power connector looms as well.
alphakry
Limp Gawd
- Joined
- Jul 21, 2005
- Messages
- 470
not sure if it was mentioned, but those are some really nice photos...
off topic: what camera do you use?
off topic: what camera do you use?
alphakry said:not sure if it was mentioned, but those are some really nice photos...
off topic: what camera do you use?
Thanks.
The last pics were done with a Nikon CoolPix 5400 and the others were done with a Nikon Coolpix 990 and processed with Adobe Photoshop. All remaining photos will be done with the 5400. I think it will focus down to about 0.4" in Macro mode. Probably one of the best electronic cameras Nikon ever made. They sell new for about $400-$600 if you can still find them, but you can get refurbished units on eBay with a Nikon 90 day warranty for about $200.Scroatdog said:FINALLY a little more progress..........
You need to step it up a bit. In five days, it will have been two months since you started this thread. FINISH IT!! And take massive amounts of pics to show us.
Well good work takes a while, besides I have been working on this since February. Just ordered some new stuff from Performance PCS that should be here next week so I can finish my wiring. Needed some more black Molex connectors and of course for some real *bling bling* gold plated Molex pins. Building this in a manner that is sleek and good looking is much like building a prototype car as everything is hand done and fitted numerous times. I can't even remember how many times that MB has been in and out of that case.
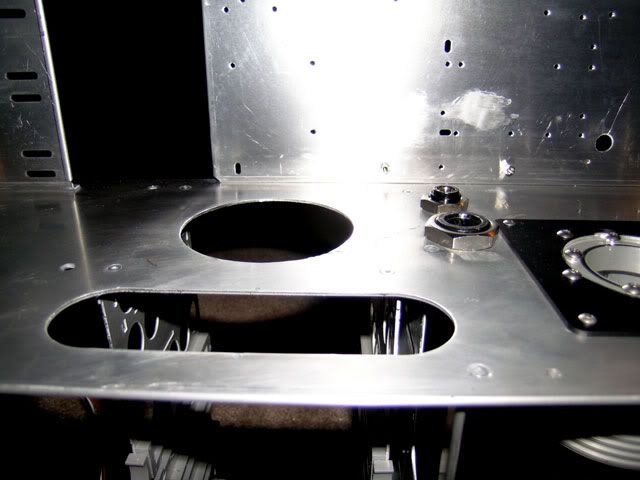
For example a while back some people thought I had cut a pretty jagged hole for the rear fan. Really there was a method to my madness as you can see from the following pic. I roughed it in with a jig saw and cut it to fit the fan. Suggestion: Don't buy any Acoustifan Dustproof's unless you want to do the same. I complained to Sharka about this fan being made from an out-of-spec injection molding die and the importer (Quiet PC} says they are all like this and tough tootsies.
At least Sharka offered to exchange them, but by the time I realized what the problem was I had already cut the fan wires and painted them.Looks like some new Dremel tool time as my fan gasket doesn't quite fit. I thought about leaving the fan gasket out on this side of the fan, but that is not possible. The thickness of the fan gasket is calculated into where the hole is for the 90 degree elbow. No fan gasket = no fit for the elbow.
Like I said this whole job has been fit, fit, and more fitting.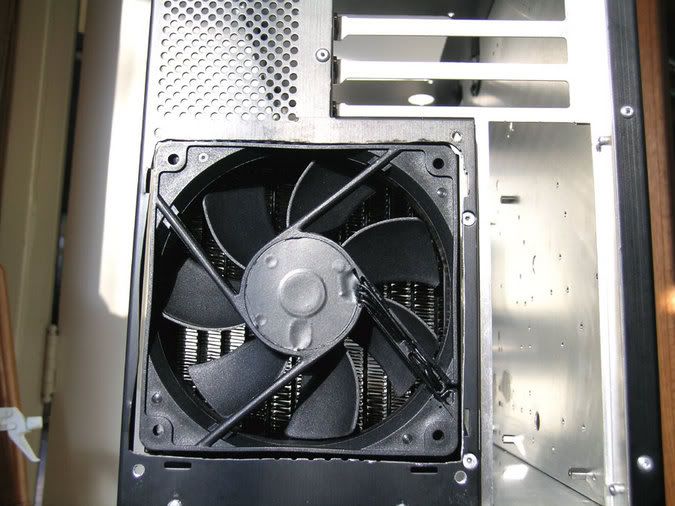
brasherman
Gawd
- Joined
- Sep 10, 2004
- Messages
- 715
I am STILL in awe.... Awesome work, just awesome.......
I am still trying to find the cajones to be able to cut a LiLi; it just seems so precious. But what you are doing is awesome. Same with Rev and Rolio's work; you enhance the look.
I am still trying to find the cajones to be able to cut a LiLi; it just seems so precious.
But what you are doing is awesome. Same with Rev and Rolio's work; you enhance the look.Small update here though it took most of yesterday to get the grill and fan fitted to the back of the case. Had to get the Dremel tool out to open up the hole a bit as the fan to grill gasket wasn't clearing. Slight problem as well because my Dremel tool burned out the speed controller and either I get it off or 30,000 RPM so I went through a few tools.
I also took some time to sand the grill down to eliminate a few scratches and then decided a little polishing wouldn't hurt as well. This is the grill that I had milled so it would have a better fit than the stock one.
This is what I started out with and had to grind off some more clearance.
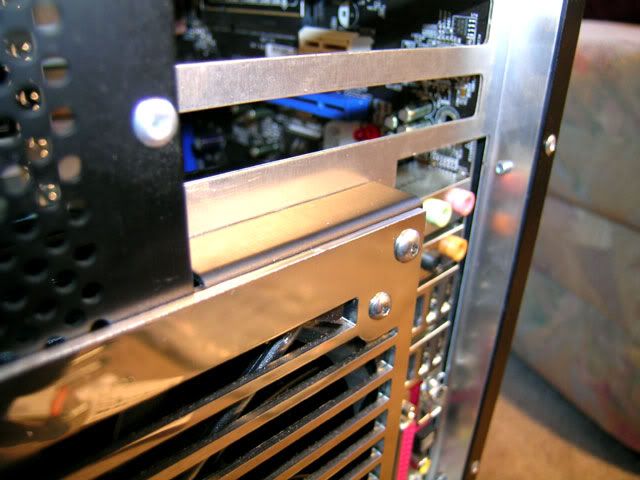
Here it shows what I had to go through to get this bolted up correctly. Essentially everytime I fitted this grill I have to move the fan back as far as possible, attach the grill to the fan, attach the 90 degree elbow, move the fan/grill/rad assembly forward so that I could screw down the four bolts that actually hold it to the case. As you can see I am exclusively using stainless steel button head socket cap screws. I also used nylock lock nuts so I don't have any problems once it is all screwed down. There are two 120mm fan gaskets used here. One on each side of the fan and as explained previously they are dyed black.
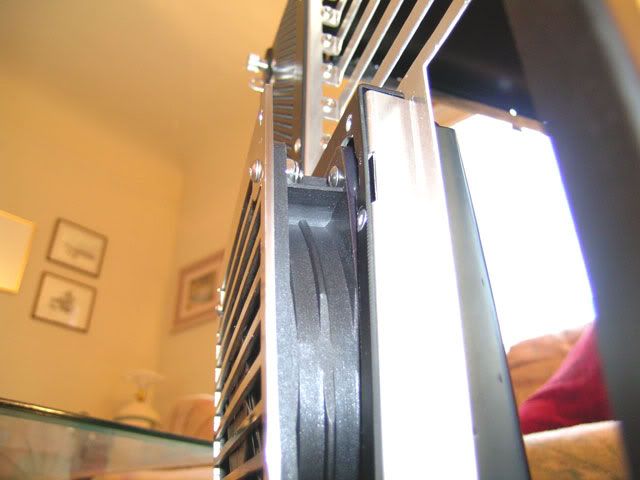
I tried to get a pic of the polished grill so you could see some reflections.
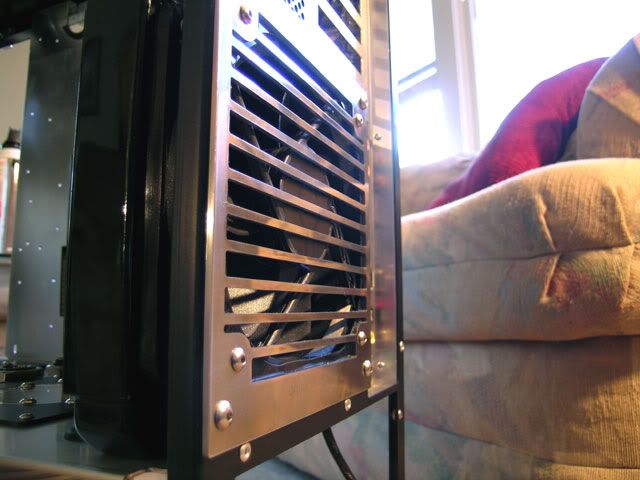
This pic shows how this grill looks when it is cut to the correct size. I tried to leave just a nice thin line of black case for that stellar look.
Again just a hint of black case.
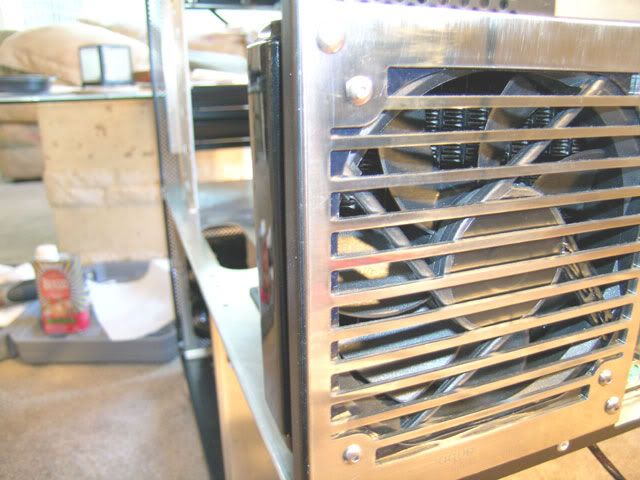
Here we are looking fron the top of the grill and it has the grill positioned so that it mates with the radius of the case.
Well that is it till tomorrow. Got the rest of my electrical stuff coming from Performance PCS so I will probably work on getting the third Aquatube and running some power wires tomorrow.
so I went through a few tools.I also took some time to sand the grill down to eliminate a few scratches and then decided a little polishing wouldn't hurt as well. This is the grill that I had milled so it would have a better fit than the stock one.
This is what I started out with and had to grind off some more clearance.
Here it shows what I had to go through to get this bolted up correctly. Essentially everytime I fitted this grill I have to move the fan back as far as possible, attach the grill to the fan, attach the 90 degree elbow, move the fan/grill/rad assembly forward so that I could screw down the four bolts that actually hold it to the case. As you can see I am exclusively using stainless steel button head socket cap screws. I also used nylock lock nuts so I don't have any problems once it is all screwed down. There are two 120mm fan gaskets used here. One on each side of the fan and as explained previously they are dyed black.
I tried to get a pic of the polished grill so you could see some reflections.
This pic shows how this grill looks when it is cut to the correct size. I tried to leave just a nice thin line of black case for that stellar look.
Again just a hint of black case.
Here we are looking fron the top of the grill and it has the grill positioned so that it mates with the radius of the case.
Well that is it till tomorrow. Got the rest of my electrical stuff coming from Performance PCS so I will probably work on getting the third Aquatube and running some power wires tomorrow.
brasherman said:I am STILL in awe.... Awesome work, just awesome.......
I am still trying to find the cajones to be able to cut a LiLi; it just seems so precious.
Thanks for the nice thoughts.
The hardest thing is the first cut. After that it goes a lot easier. Also remember that there is a God and your not it so don't worry about making a mistake. The trick is to only make mistakes that most people won't see unless they look really hard. waynev said:First off, awesome work on the case.
Second, I'm not sure if you noticed it or not, but the Plextor that was linked to on page 3 or 4 comes with a black bezel in the box.
Thanks for mentioning that AND the link.
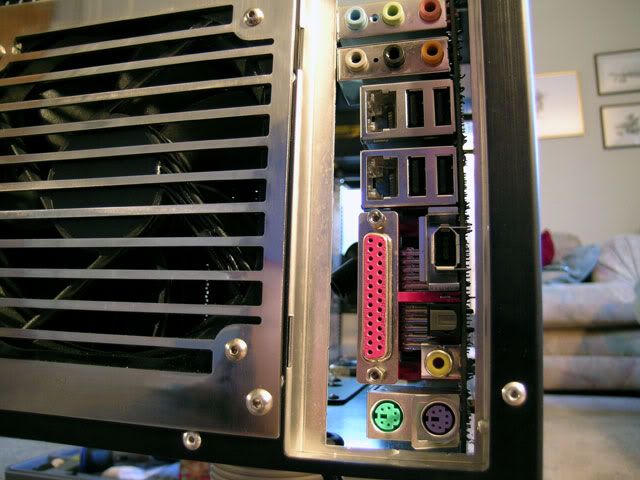
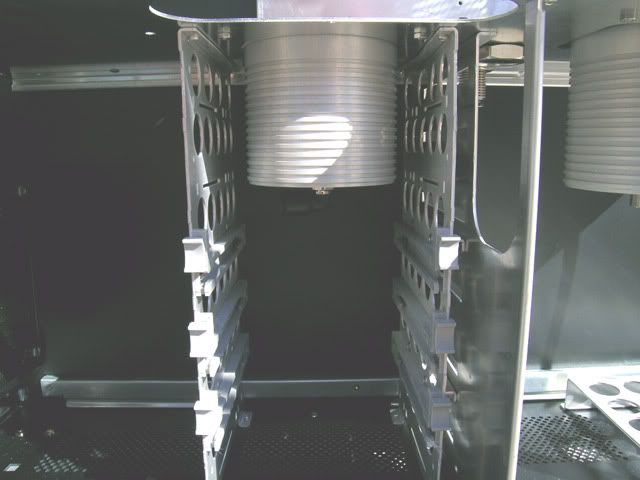
I read on NewEgg that the Plextor SATA drive is totally incompatible with the NF4 chipset SATA headers. The reason I was thinking about it was to get smaller, less conspicuous, HD cables. Well I guess it pays to look before you leap. Little update today as I finished putting in my 3rd Aquatube which is for the HD loop. The original plans were for an Aquainlet with my Aquastream. After I set it in the case I decided that it just looked kind of out of place iff you know what I mean. Here is the hole I cut for the Aquatube. You can also see now the bushing I showed a while back painted and installed. The main ATX power loom will be going through here to the MB. The smaller part in the back is an 8mm nickel plated pushfit painted on the top.
Here is looking to the back of the middle case as well. That big long cable you see in the bottom right is the fan cable that will go to the Aquaero in the front of the case.

Here is the Aquatube as you see it under the middle floor. I removed the top two HD rails to get the Aquatube in, which leaves me with three watercooled HD's for now.
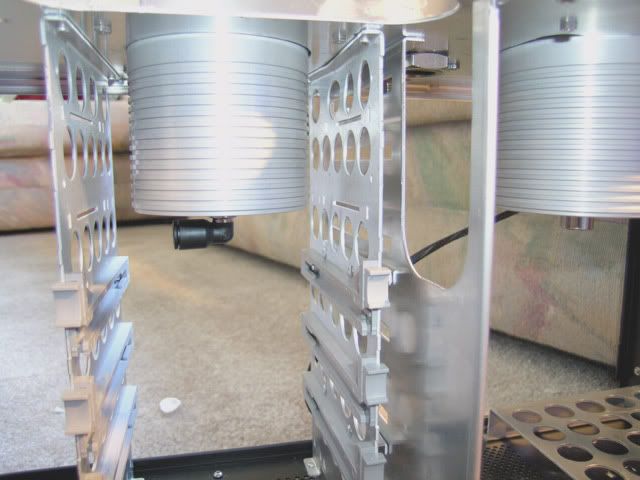
Here is with the Aquatube screwed down to the case. If you are an AC fan then you probably noticed that I deviated with the size of the screws that hold the mounting plate on. I just thought it looked too busy with all those 4mm screws on the face of the Aquatube. So to break up the monotony I decided to use 3mm screws instead. I think it gives it a much better look now.
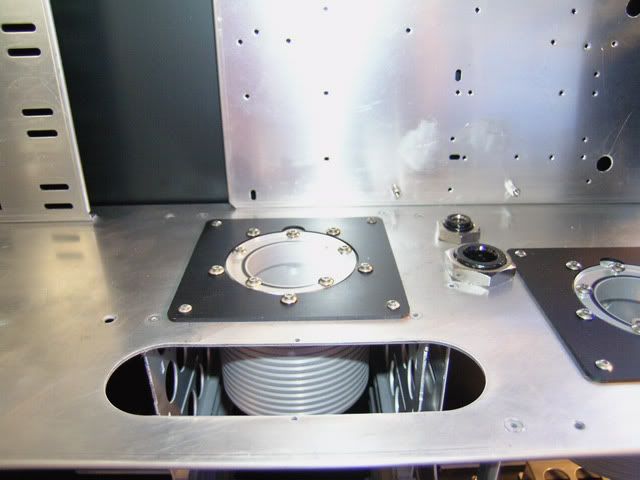
Here is a close-up of the bulkhead fittings. Debating whether to strip the paint off and sand the nickel plating off so I have a better surface to paint on.
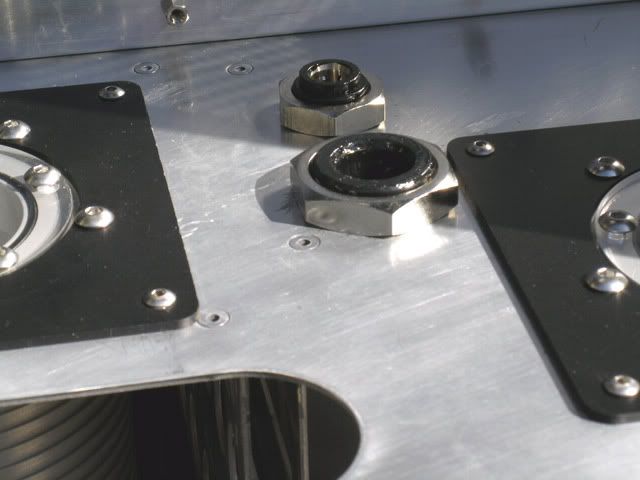
Here is a look from the back of the case.
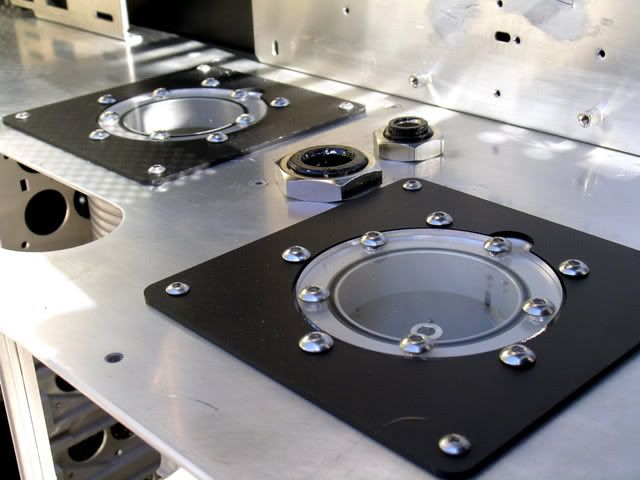
With this pic I think you might begin to see why I choose black fittings and black tubing. There really is an 8mm 90 degree pushfit at the bottom of the Aquatube.
Well that is it for now so see ya later alligator.
Here is looking to the back of the middle case as well. That big long cable you see in the bottom right is the fan cable that will go to the Aquaero in the front of the case.
Here is the Aquatube as you see it under the middle floor. I removed the top two HD rails to get the Aquatube in, which leaves me with three watercooled HD's for now.
Here is with the Aquatube screwed down to the case. If you are an AC fan then you probably noticed that I deviated with the size of the screws that hold the mounting plate on. I just thought it looked too busy with all those 4mm screws on the face of the Aquatube. So to break up the monotony I decided to use 3mm screws instead. I think it gives it a much better look now.
Here is a close-up of the bulkhead fittings. Debating whether to strip the paint off and sand the nickel plating off so I have a better surface to paint on.
Here is a look from the back of the case.
With this pic I think you might begin to see why I choose black fittings and black tubing. There really is an 8mm 90 degree pushfit at the bottom of the Aquatube.
Well that is it for now so see ya later alligator.
revenant
[H]F Squad Captain
- Joined
- Apr 10, 2005
- Messages
- 16,352
Wow... my OCD is in awe of your attention to detail. So are you going to have three rads? one single 120mm in front, one single 120mm in the back, and then the dual 120mm on the top?? this is definitely looking like the most professional build (in progress) I have ever seen.
So are you going to have three rads? one single 120mm in front, one single 120mm in the back, and then the dual 120mm on the top?? this is definitely looking like the most professional build (in progress) I have ever seen.revenant said:Wow... my OCD is in awe of your attention to detail.
Yes three radiators are already been put in and they are all 120mm Black Ice Pro's with 1/4" BSPP threads. If you go back towards the first part of this log it is evident why I didn't put a 240 in the top. However on the front and back radiators are in as the MB wiring has to be done before I fit the top one in.
The HD rack I got from you will probably be used as well in a somewhat modified state.
Top Nurse said:
is that a scratch i see on your bottom res.?
revenant
[H]F Squad Captain
- Joined
- Apr 10, 2005
- Messages
- 16,352
I think that's a hair... hmmm... looks like it continues into the case panel..
If your talking about that black looking thing in the closest Aquatube, I think that is a reflection off one of the MB tray slots or a shadow from one of the PCI slots. I took that pic out in the sunlight today and it doesn't exist on the Aquatube.
alphakry
Limp Gawd
- Joined
- Jul 21, 2005
- Messages
- 470
hehe, dam - working on it since Feb?
by the time you finish, your parts will be obsolete! =)
and the scratch he's talking about definatly looks like a hair! TN is darkhaired!
by the time you finish, your parts will be obsolete! =)
and the scratch he's talking about definatly looks like a hair! TN is darkhaired!
alphakry said:hehe, dam - working on it since Feb?
by the time you finish, your parts will be obsolete! =)
and the scratch he's talking about definatly looks like a hair! TN is darkhaired!
It was late last night when I was looking at those pics and it does indeed seem to be a hair.
My box will never be obsolete as it has a timeless conservative style to it. The MB was picked so that I could migrate to the dual core AMD designs down the road. Memory is always modifiable and I really wanted the *bling bling* of the LED's on the Corsair ram. The Asus 6600 GT's were bought just to get my feet wet in SLI as back in January I wasn't sure if it was going to take-off or not. I would look to see a pair of 6800 or 7800 GT's when I get my Silver TwinPlex Pro's in.
Erasmus354
[H]F Junkie
- Joined
- Mar 12, 2004
- Messages
- 9,450
Obsolete is all relative anyways. TN's current rig will be able to play games for at least the next two years pretty easily. Not to mention she can probably get a pretty decent overclock out of her equipment to squeeze an extra few months out. As she said, in two years she could upgrade to dual core and get new video cards and is set for another 3 years.
ryuji said:i have a question for you TN, for the cost of all the AC gear you probably could have had phase change on the cpu and gpu, i must ask why not?
Who wants a computer that sounds like a drinking fountain?
Feeding Frenzy has never been about the money to performance equation. It has been about style and reasonable performance. IOW, the PC would be a muscle car and FF would be an european performance luxury sedan. Erasmus354 said:Obsolete is all relative anyways. TN's current rig will be able to play games for at least the next two years pretty easily. Not to mention she can probably get a pretty decent overclock out of her equipment to squeeze an extra few months out. As she said, in two years she could upgrade to dual core and get new video cards and is set for another 3 years.
Well believe it or not I'm not really hot on computer games. However, I do buy them to test out my hardware.
My 9800 Pro on an OC'd AMD 2400+ runs HL2 just fine. revenant
[H]F Squad Captain
- Joined
- Apr 10, 2005
- Messages
- 16,352
Top Nurse said:Who wants a computer that sounds like a drinking fountain?
<enter Porche Cayenne turbo>
...er, Audi S8?
- Status
- Not open for further replies.