Built-in Office

Status
Not open for further replies.
The key tool is a miter saw. Being able to cut perfect 90 degree angles in a split second without having to line anything up is great, and it really helps with the fit and finish. I built my other desk with a skill saw, and there is a huge difference in ease in construction.

Next, need a drill. May sound simple, but one with a quick change chuck is great- can switch between a countersink bit and screwdriver bit really quick.

Next, I'd get a set of forstner bits. WTH are these? Well, they allow you to make very clean and big holes. They work really well for big holes, and it makes sense to not screw up a whole bunch of expensive wood with standard cheap/fast cut (read: splinters and rough holes) drill bits. Here's my set:

PICT8247.jpg


Next you need the little things, the stuff that adds up especially if you go get it all at once.. I finally got into this house and have a real job so I bought alot of what I have in 2 or 3 months- I had enough to get by before but it's the whole right tool for the job adage. Got the miter saw for Christmas :D which started this whole project burr in my paw.

  • Short Level
  • Extension Cords
  • Long Level / Straight edge
  • Skill Saw - long cuts that you can't do with the miter saw
  • Straight back hand saw - cut out the radius left by the circlular saws
  • Quick clamps - I'd suggest 3 or 4
  • Bar clamps - for long stuff, 2 or 3 24" or 36"'ers
  • Jigsaw for curves
  • Hammer
  • Belt Sander
  • Fine / Inside corner sander
  • 2 Measuring Tapes (one out in the garage and one inside- saves lots of trips)
  • Woodworking square - 2' by 3' typically; 90 degree corner
  • Sharpee's and pencils
  • Patience
  • Beer
  • - EDIT-
  • Router and bits

I really like my Rigid Coupound Sliding Miter Saw - best aquisistion yet.. has a laser that's right next to the blade, gives you a visual that you aren't lined up.. really clever.
12" Compound Sliding Miter Saw [edit]Home Depot may have alot of cool shit- but linking to their website is a major pain in the ass- black eye for HD.. :mad: [/EDIT]
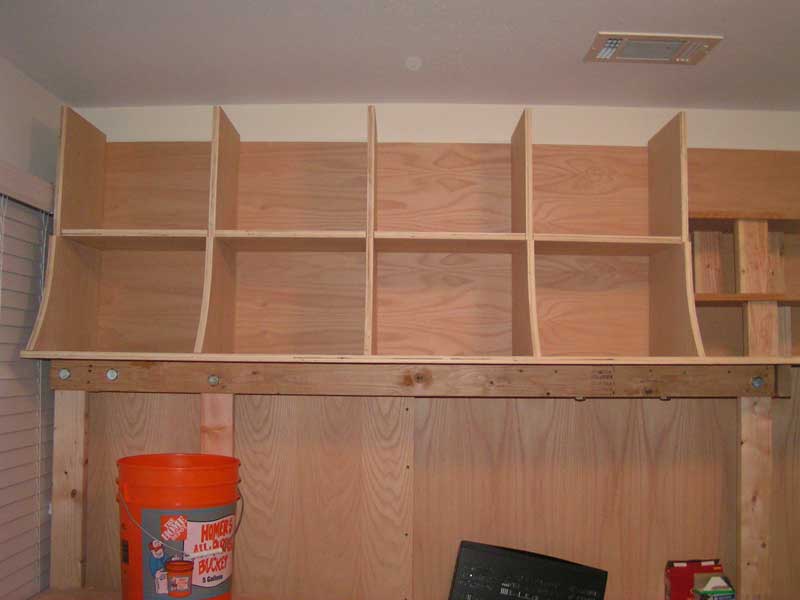
Here are my pics for the night:

Cleaned up a little bit.
PICT8237.jpg


Rough blanks for the uprights on my upper shelves..
PICT8238.jpg


Finished Template.
PICT8239.jpg


Cutting Everything at once. Advantage of a 12" sliding miter saw- can do big/deep cuts without fanangling.
PICT8240.jpg


PICT8241.jpg


Cutting everything together; again this would not be possible if my saw did not slide on guides.
PICT8242.jpg


PICT8243.jpg


PICT8244.jpg


Blanks are all the same size now.
PICT8245.jpg


Screwed up at the end.. Grr.. :mad:
PICT8246.jpg


Also, I'm not using any nails; just finish screws, deck screws and bolts.

Here I made each piece the exact same size (well, almost).
I screwed up at the end; had to finish off the cut with my hand saw, didn't line it up right..


HighLatency said:
Man that is awesome...

I just moved into a house as well and I stumbled upon your thread while doing a little bit of desk research. I have a whole room which is going to be transformed into my office, with three walls that can be used for my desk. The house was built in the early 80's and has outdoors / nature feel to , with alot of stuff being custom built by hand, so I want to keep it that way with the office. I'm just now getting started with brainstorming and drafting out ideas.

Here's the kicker though, I've got very little experience with wood working. What tools are required and where have you been sourcing your materials? What other tips can you offer for those less experienced?

Keep up the good work, I'm interested in how it will look when its all completed!
 
Another suggestion; do what I am doing- build the basic frame and whatever won't be seen out of cheap pine. You can get straight and true lumber from Home Depot (they call it 'Hampton Premium') you have to look thru the stacks to find the good ones- the premium stack has more of the good sticks.

Big (dimensional) peices of any hardwood will set you back a bunch; so only use that where neccessary. Otherwise you can add a 1/4" veneer to your cheap-ass studs and no-one will be the wiser. With a belt sander and assembling the entire thing with screws so it doesn't shift and split the final finish, you can create the appearance of virtually no seams.

A little bit of high-end wood putty and sanding with a solid base so it doesn't flex and crack is the best way to go.

Example:

Desk I built about 4 years ago.. originally planned for a rack on the far end; and mail slots up top. Works really well how I have it set up now..

PICT8248.jpg


PICT8250.jpg


I matched up a piece of real oak with oak veneer plywood, and if you'll notice on the joint at the right, they flexed with temperature changes and loads differently (not too many engineer's around here so I'll save the lingo) Basically, I didn't force a continuous connection at that splice and different stiffnesses and CTE's caused the finish to split.

PICT8252.jpg


So now I am alot more careful about rigid splices and finish detailing- i.e.- dont leave leave a joint like that unsupported..

And this is another example of the 2x4 and 2x6 pine framing with an oak veneer.
 
Found pics of that desk from Nov 2001 -

DSC00007.jpg


DSC00028.jpg


Didn't find the pics I had of when I built it..

A pic I took in October 2001: :D
DSC00183.jpg
 
Got a big peice cut and mocked up:

PICT8254.jpg


PICT8255.jpg


PICT8256.jpg


PICT8259.jpg


PICT8260.jpg


PICT8261.jpg


PICT8262.jpg


PICT8263.jpg


Note to self: measure twice, cut once; folders won't fit with fascia.. oh well, will have to put them up top or slide them in diagonally.. :mad: :( :D
PICT8264.jpg
 
The "Light Canopy" - I need votes on whether to keep it like it is or cut it back; I'll also have some incandescent small cans (2) halfway behind the track lights- the track holds 50W (really bright for their size) Halogens.

I'm likin' it right now.. but I might wake up tommorrow with a change of heart.

PICT8266.jpg


PICT8267.jpg


PICT8268.jpg


PICT8269.jpg


PICT8270.jpg


PICT8272.jpg


PICT8273.jpg
 
if that runner will support a couple more lights, put em on and go with that, cuz really that looks really good, and i think that in the end it will come in handy. also have you considered perhaps some of those cable lights to mount under the shelves?
 
GtrPmp said:
if that runner will support a couple more lights, put em on and go with that, cuz really that looks really good, and i think that in the end it will come in handy. also have you considered perhaps some of those cable lights to mount under the shelves?

I can probably put 3 more lights on that without too much worry.. That puts it at a bit under 3 amps; probably okay for Romex. - before everything gets hooked up, I'm having an electrician hook up a couple more breakers for this room (1 for all the misc lights and BS and one for the UPS that all of the computer equipment will plug into.).. Wouldn't a fire suck after all of this work. :eek:

If you look at one of the previous posts for a pic of the shelf that the orange bucket is on, you'll see what I am using for low-voltage lighting.

It's like the rope stuff, but a bit easier to use; and mount.
 
jen4950 said:
A pic I took in October 2001: :D
DSC00183.jpg

Oh, I love crane accident pictures. Too bad, most of the time people get hurt or killed during them. I went to a seminar about 5 years ago on crane accidents. The speaker was an engineer from Canada that was the renowned crane accident investigator in North America. He must have had 100 slides of crane accidents. 99% were the fault of operator error. The most amazing one was during the erection of a stadium in Michigan where they had two tracked 100ton+ cranes on either side moving a truss into place. The cranes weren't tracking parallel and where actualy traveling apart while each was rigged to one of the truss.
 
ah, i love the track lighting, awesome touch. I must say though, crank up the A/C if those are halogen hehe. I think my room is inherently hot, but the halogen lamp i have does it no justice.
 
tuck one super bright giant bulb in your ceiling and run fiber optic wire to the places you need light.
 
Tiny said:
tuck one super bright giant bulb in your ceiling and run fiber optic wire to the places you need light.

Got any links on this kind of stuff?
 
that is going to be one crazy desk! i want one, maybe it could actually hold all my stuff :)
 
Thanks for the advice, pics, and tool list. I have a bunch of other little projects that I would like to make like a pantry, end tables, medicine cabnet, and so on. Despite not having much experience with woodworking, I've always wanted to learn how and I suppose there is no time like the present.

I'm interested in how your going to apply the veneer, it seems as if it would be trickey with all the nooks and cranies your going to have on the desk, but I've never done anything like that before... =)

What would you reccomend for a easy first project to get familure with the tools and the process? I was thinking the medicine cabnet, but I'm curious if you have anything else which could serve as a tutorial of sorts.

I need to finish getting settled in the house so I have garage space to work with, but I'm going to go check out the home depot and lowes to see what kind of tools they have for wood working. When I get closer to getting started on the desk would you mind if I PM'd you to check out my plan, so you might be able to steer me clear of any issues I might not expect due to lack of experience?

Anyway, keep up the good work and keep us posted!
 
This is sweet and the fact that you're pretty much building this in place is cool as well. I'm *very* interested in details of the veneer work when you get to it. I'm planning a desk myself and would like to go with cherry which is hugely expensive... Veneer would be a big saver. Plus I'm planning on steam-bending some of it and snapping a 9' piece of 1x10 cherry would probably cause a few tears. :p Sorry, not meaning to hijack, this is very nice what you're doing.

I'm suprised you didn't list a router in your needed inventory... I swear by 'em. Then again I'm not an engineer so maybe you caliper-heads design around that 'need'. ;)

2nd vote for a forstener set (and they're cheap--unlike router bits).
 
jen, ive noticed a few composites in the background in some your pics. what house were you in? ....at A&M?
 
HighLatency said:
Thanks for the advice, pics, and tool list. I have a bunch of other little projects that I would like to make like a pantry, end tables, medicine cabnet, and so on. Despite not having much experience with woodworking, I've always wanted to learn how and I suppose there is no time like the present.

I'm interested in how your going to apply the veneer, it seems as if it would be trickey with all the nooks and cranies your going to have on the desk, but I've never done anything like that before... =)

What would you reccomend for a easy first project to get familure with the tools and the process? I was thinking the medicine cabnet, but I'm curious if you have anything else which could serve as a tutorial of sorts.

I need to finish getting settled in the house so I have garage space to work with, but I'm going to go check out the home depot and lowes to see what kind of tools they have for wood working. When I get closer to getting started on the desk would you mind if I PM'd you to check out my plan, so you might be able to steer me clear of any issues I might not expect due to lack of experience?

Anyway, keep up the good work and keep us posted!

Yea- no prob; PM me anytime-

I just finished a medicine cabinet; it was at the beginning of this thread. Start with something small, so if you screw up you don't have a whole bunch of wood invested in it; from there you get the hang of it..
 
eggrock said:
This is sweet and the fact that you're pretty much building this in place is cool as well. I'm *very* interested in details of the veneer work when you get to it. I'm planning a desk myself and would like to go with cherry which is hugely expensive... Veneer would be a big saver. Plus I'm planning on steam-bending some of it and snapping a 9' piece of 1x10 cherry would probably cause a few tears. :p Sorry, not meaning to hijack, this is very nice what you're doing.

I'm suprised you didn't list a router in your needed inventory... I swear by 'em. Then again I'm not an engineer so maybe you caliper-heads design around that 'need'. ;)

2nd vote for a forstener set (and they're cheap--unlike router bits).

Don't worry- not a hijack; I call it veneer- but all I'm doing is nailing a thin piece of oak in front of the pine. The pine carries all of the load, and the oak is just there for looks.

I have a big (2'x4'x10" or so) black mixing tub- they use it for drywall etc. And my kitchen is right next to the garage, so what I did was over the course of a few beers, fill the tub with boiling hot water from my gas stove. Then with 2x4's etc and a cinder block, bend 2 pieces at a time in the steaming hot water. The wood gets very pliable with hot water..

And my router is a critical tool that I forgot from my list :D - went back and added it..
 
FastBu said:
jen, ive noticed a few composites in the background in some your pics. what house were you in? ....at A&M?

Pike- back in the day.

Then everyone went their seperate ways while I stayed in Grad school. Interestingly enough, grades went up :D
 
corebreach said:
Wow seconded. The overhead cubbies are genius, I could use 15 or so of those things. BTW, would you mind showing us your metallic maroon fridge? :D
(http://neubauer.tv/images/Office/W_01/PICT8256.jpg)

HA!!

That's my kegerator- :D Perfect place for it in the garage- that's where I stash my beer.

Here are a couple pics that I already have posted to my website. I'm too tired to go take new ones.. These were around when I built it- now I just put cases down where the keg normally sits; gotta work during the week- can't drink a keg fast enough :D

Kegerator.JPG

Kegerator_02.JPG

Kegerator_03.JPG

keg_1.jpg

keg_2.jpg


If you'll notice, it used to be lime green; I bought it for 10 bucks at a pawn shop in college- it runs great, serves it's purpose..(so to speak :D )

If anyone wants better pics, I'll get up and go take some.. Speak up if so..
 
Kegerators rock, my buddy has one I helped him build. We're buildin' a BarMonkey (computerized bar that can mix any drink for you on command) for him when he moves into his new house. Looks good so far man, keep it up.
 
quick question for the readers of this thread: have any of you guys noticed that the thread starter is a FEMALE?? :confused:

i mean, if she has no problem w/ you ppl callin her a guy, then thats her decision. but i just think that its slightly disrespectful for you guys to be callin her a guy while shes a woman.

anyways... [/RANT]

btw, nice mustang :D weve got a 1965, custom red, V8 :eek:
 
Wrong rant- read again-

100% Male heterosexual. Actively seeking companionship from available hot and smart ladies :D

jen are my initials- jen4950 was assigned to me by A&M in 1998- it stuck.

TSS Modder said:
quick question for the readers of this thread: have any of you guys noticed that the thread starter is a FEMALE?? :confused:

i mean, if she has no problem w/ you ppl callin her a guy, then thats her decision. but i just think that its slightly disrespectful for you guys to be callin her a guy while shes a woman.

anyways... [/RANT]

btw, nice mustang :D weve got a 1965, custom red, V8 :eek:

Well, if you'd RTFT, then you'd notice that this subject had already been dealt with. He's a guy.
 
DarkMonkey said:
Kegerators rock, my buddy has one I helped him build. We're buildin' a BarMonkey (computerized bar that can mix any drink for you on command) for him when he moves into his new house. Looks good so far man, keep it up.
just googled and... :eek:!!!! i have a new project! :D
 
Well SHIT.

Top module is assembled except for the details. Too bad the fucker weighs 200+ pounds. Going to have to wait till tommorrow for help to put it in place.

PICT8296.jpg
 
Once your done drive to my house in plano and build me a new desk. :) Great work.

-Alex
 
good work, but why couldn't you design it with wood that isn't so thick. I doubt sheets of wood half the size would break no matter what you put on them. But anyways, good work.
 
Hole-lee-crap.

ezkill said:
good work, but why couldn't you design it with wood that isn't so thick. I doubt sheets of wood half the size would break no matter what you put on them. But anyways, good work.


You ever weigh a full 3" binder? How about 30 of them? I think he needs as much support as he can get there.
 
ezkill said:
good work, but why couldn't you design it with wood that isn't so thick. I doubt sheets of wood half the size would break no matter what you put on them. But anyways, good work.

The man is a structural engineer... he must have obvious reasons for his use of materials... :rolleyes:
 
Status
Not open for further replies.
Back
Top