Navigation
Install the app
How to install the app on iOS
Follow along with the video below to see how to install our site as a web app on your home screen.
Note: This feature may not be available in some browsers.
More options
You are using an out of date browser. It may not display this or other websites correctly.
You should upgrade or use an alternative browser.
You should upgrade or use an alternative browser.
Project PowerMac G5/X86 - SLI you bet!
- Thread starter MrBean_Oz
- Start date
Damn dude that thing is a monster for sure. Imagine dual monitors with those? Be insane!
Wouldn't fit on my desk either - otherwise I may have been tempted
")
Seriously though, this rig will be used on my racing sim, while 3x HP 1955's will do duty on my desk.
The G5-setup will be mainly racing sim rig.....good fun.
MrBean_Oz said:Wouldn't fit on my desk either - otherwise I may have been tempted
Seriously though, this rig will be used on my racing sim, while 3x HP 1955's will do duty on my desk.
The G5-setup will be mainly racing sim rig.....good fun.
Yeah, it would fit on my desk. Wouldnt fit in my budget though, thats for sure.
Anyways, what racing sim? live for speed?
Budget, what budget? After this, I have no budget - rofl...
Anyway, mostly GTR.
Here is my Racing Sim setup - not completed yet, brought it with to Australia when I relocated here from South Africa beginning af April. Using ECCI 6000 wheel and pedals, and this G5 mod with ACD will compliment it nicely.
Hey, boys will be boys, just our toys gets progressively more expensive
It's good to be a Man
MrBean_Oz said:It's good to be a Man
Ah, truer words are rarely spoken my friend.
chemist_slime
[H]ard|Gawd
- Joined
- Jul 24, 2005
- Messages
- 1,102
MrBean_Oz said:Ok guys,
just confirmed this order with Apple, as I said earlier I would luv to get my hands on this:
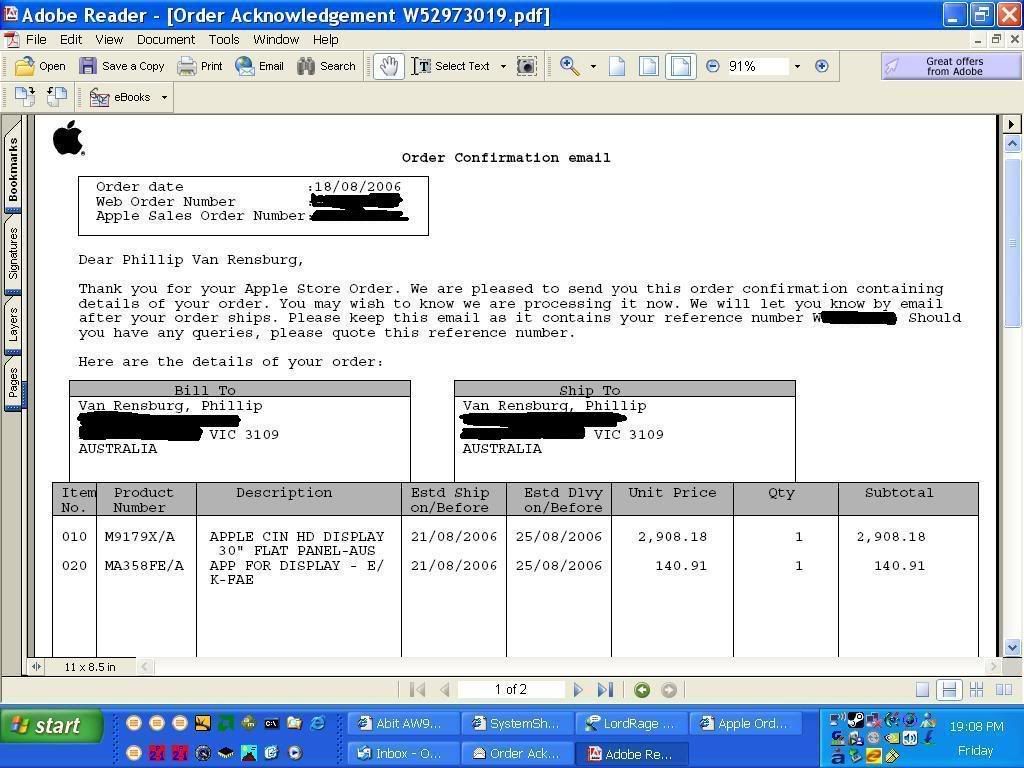
So, it should be delivered mid next week, then I can go ahead at full steam again.
Should round the project off nicely
2900? Didn't they dtop their price to 1999. Anyways, I have one of those 30" Cinema display too. They're absolutely awesome!
chemist_slime
[H]ard|Gawd
- Joined
- Jul 24, 2005
- Messages
- 1,102
mj007 said:That's Australian dollars = $2215.65 USD.
Oh, haha, now that makes a lot more sense.
spyder_flex97
[H]ard|Gawd
- Joined
- Jun 14, 2002
- Messages
- 1,069
the case is coming along great....my g5 case just came in today
how did you wire the power button to your motherboard?
how did you wire the power button to your motherboard?
Hello Everyone,
I will use the original G5 frontpanel connector, and use ribbon cable to wire to my motherboard power/usb/firewire headers
Ok, it's update time, and although not a huge update, it is one that took a lot of thinking, and careful planning, measurement, and some dremelling and filing action.
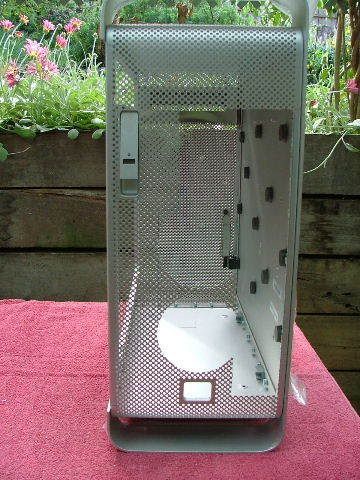
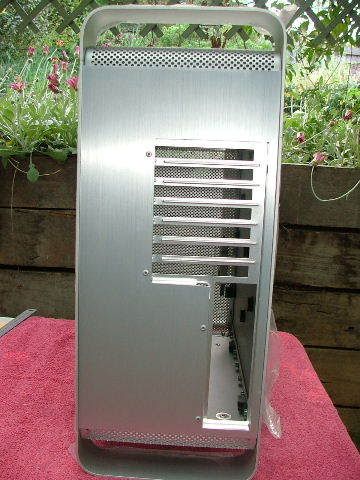
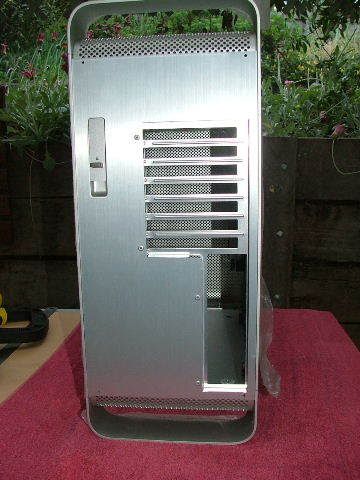
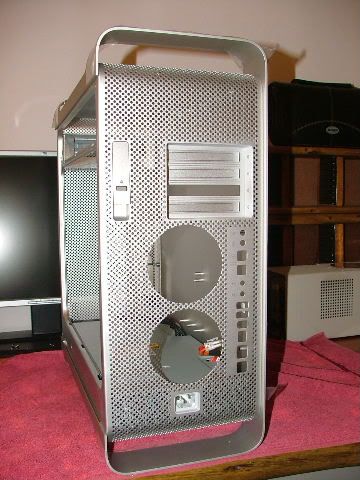
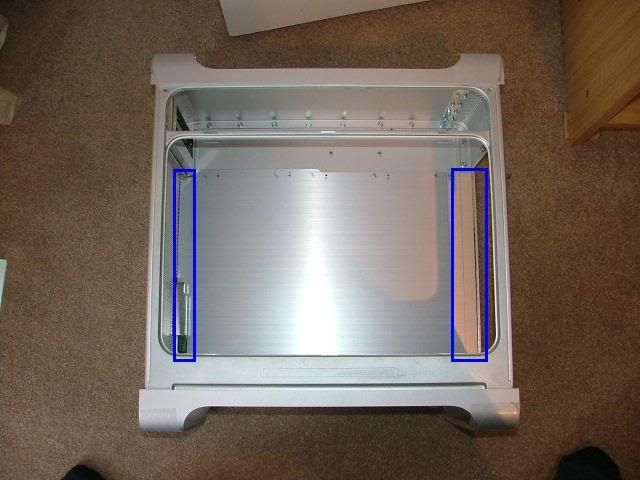
What was I busy with, well.....interesting...remember this shot I posted at the beginning of this project:
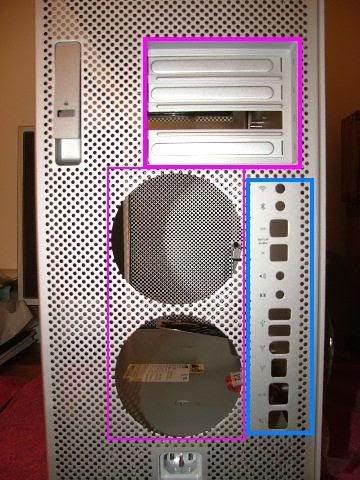
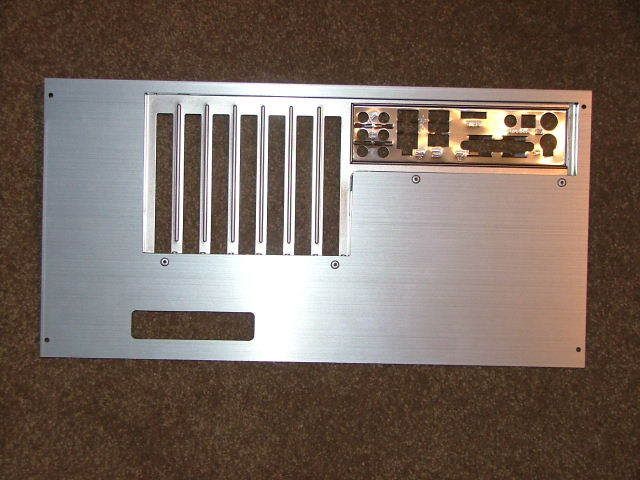
I was going to use the eVGA Micro ATX board with this case, but since then, I managed to get a few Conroe cpus, and even more motherboards. I decided to cancel the eVGA Micro ATX AMD 64 4800 setup, and rather make this a decent gaming rig by mounting the Asus P5W DH Deluxe board in this case, together with the X6800 cpu of mine.
Well, obviously one of my goals was to try and keep the back of the G5 original, as in above photo, but that would have only worked with 4-slot micro-atx board.
So, I had to make a plan, and in the end, the final result came out very well, near-factory look, or maybe even better than factor look. By making new backplate/IO-plate, I can of course now mount any ATX motherboard in future, and not limit myself to micr-atx only
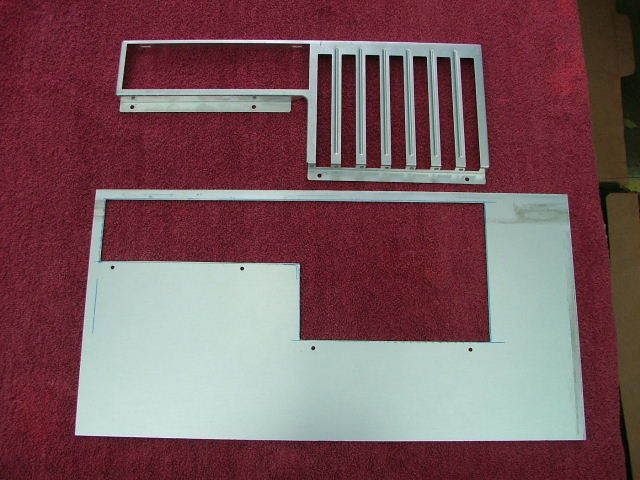
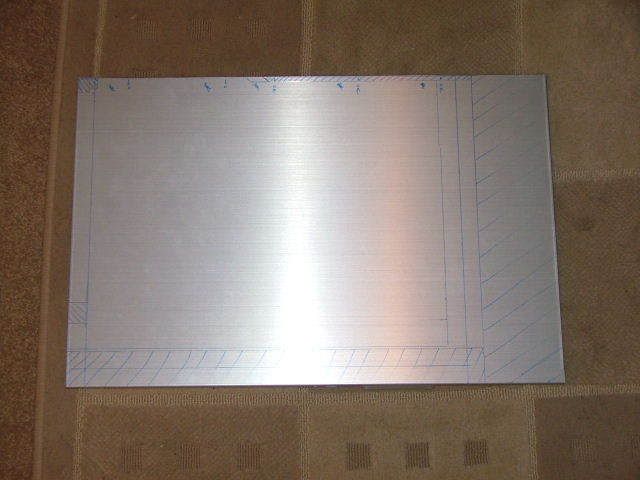
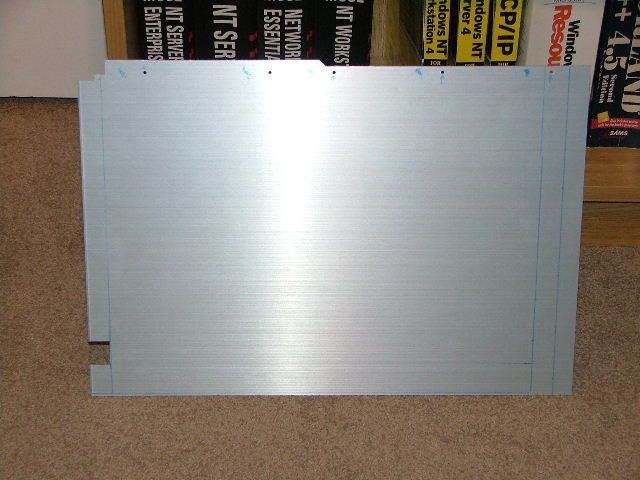
So, this is what I started of with, a 199mm x 391mm aluminium, this was cut from one of my spare Lian-Li PC70 sidepanels.
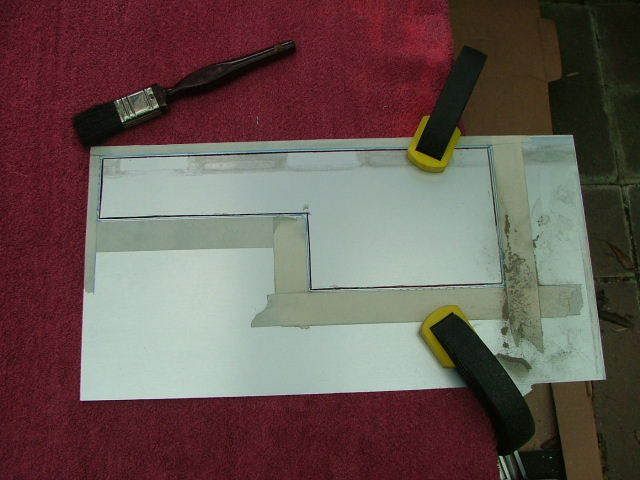
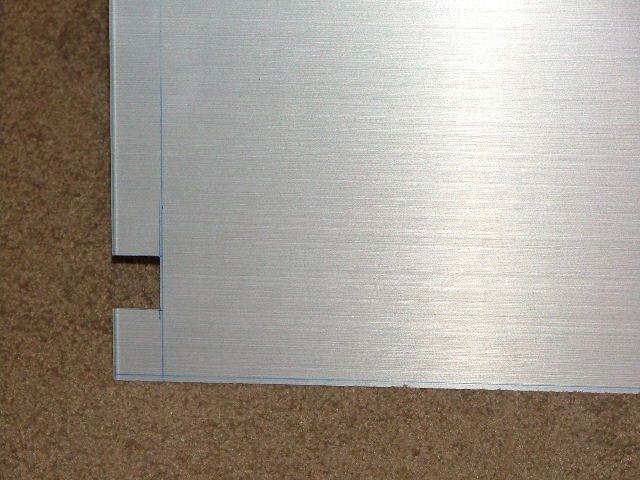
This is what I want to do away with, in 2 steps, I need 2 steps to make accurate markings on the new donor i/o-plate.....
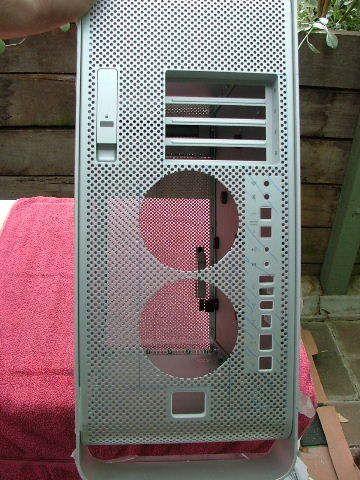
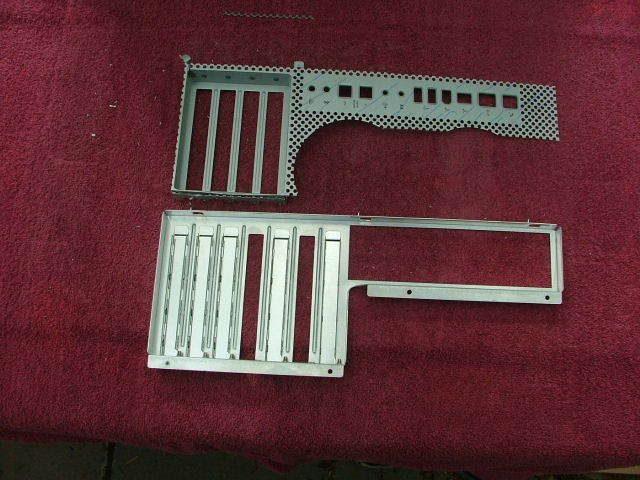
and, after some high-speed dremel work, I end up wityh this - the top piece is original G5 i/o-plate, and the bottom one I removed from a cheapish alu case - I got the case specifically for this i/o-plate, as I did not want the bigger and bulkier Lian-Li PC65 unit.....
how did you wire the power button to your motherboard?
I will use the original G5 frontpanel connector, and use ribbon cable to wire to my motherboard power/usb/firewire headers
Ok, it's update time, and although not a huge update, it is one that took a lot of thinking, and careful planning, measurement, and some dremelling and filing action.
What was I busy with, well.....interesting...remember this shot I posted at the beginning of this project:
I was going to use the eVGA Micro ATX board with this case, but since then, I managed to get a few Conroe cpus, and even more motherboards. I decided to cancel the eVGA Micro ATX AMD 64 4800 setup, and rather make this a decent gaming rig by mounting the Asus P5W DH Deluxe board in this case, together with the X6800 cpu of mine.
Well, obviously one of my goals was to try and keep the back of the G5 original, as in above photo, but that would have only worked with 4-slot micro-atx board.
So, I had to make a plan, and in the end, the final result came out very well, near-factory look, or maybe even better than factor look. By making new backplate/IO-plate, I can of course now mount any ATX motherboard in future, and not limit myself to micr-atx only
So, this is what I started of with, a 199mm x 391mm aluminium, this was cut from one of my spare Lian-Li PC70 sidepanels.
This is what I want to do away with, in 2 steps, I need 2 steps to make accurate markings on the new donor i/o-plate.....
and, after some high-speed dremel work, I end up wityh this - the top piece is original G5 i/o-plate, and the bottom one I removed from a cheapish alu case - I got the case specifically for this i/o-plate, as I did not want the bigger and bulkier Lian-Li PC65 unit.....
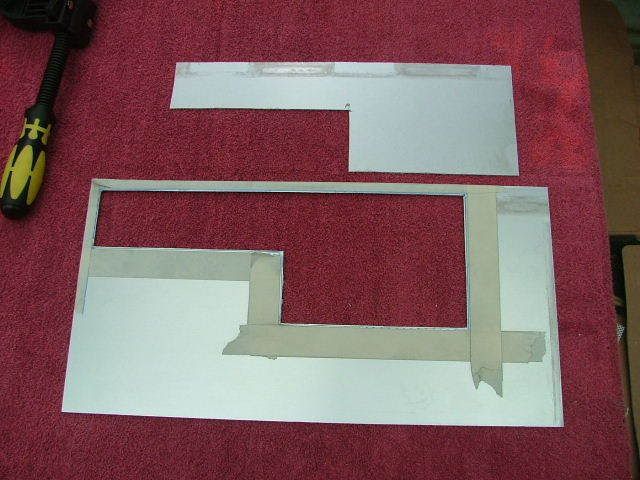
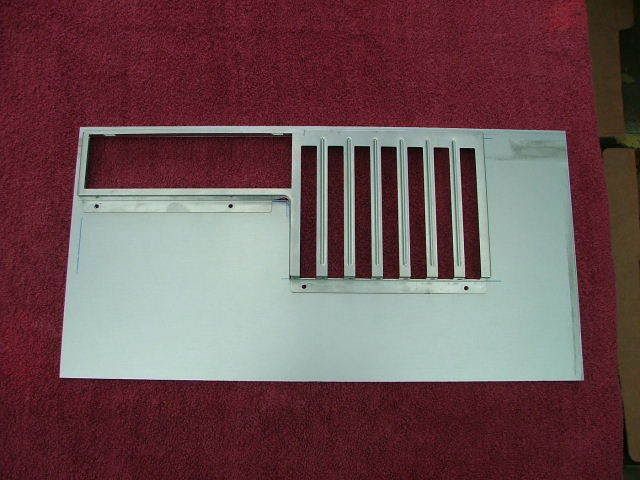
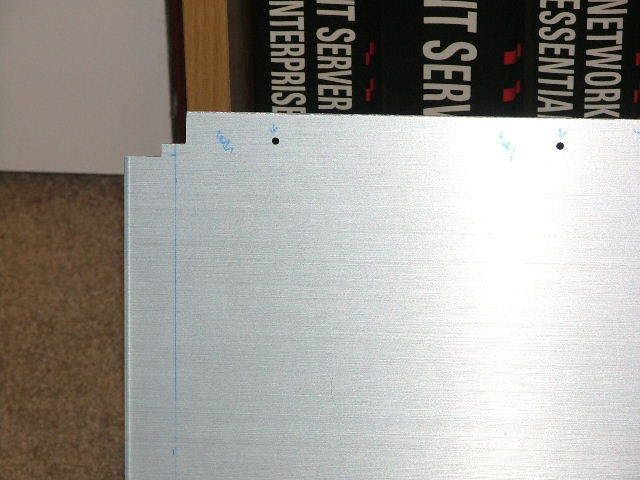
This is the phase1 cutout complete....
After some measurements and markings, I could start on the new backplate....
And here's the cutout finished, before filing.....
a bit of filing, and some more markings, and drilling, we end up with this - not complete yet, still a few more things to do, but good enough for now....
After some measurements and markings, I could start on the new backplate....
And here's the cutout finished, before filing.....
a bit of filing, and some more markings, and drilling, we end up with this - not complete yet, still a few more things to do, but good enough for now....
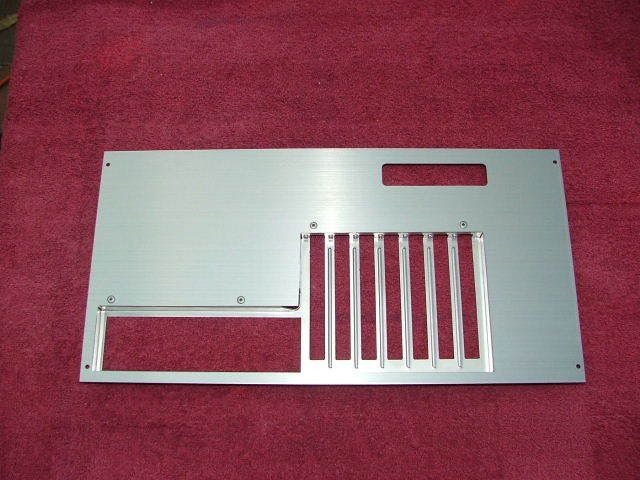
from the backside with the i/o-plate fitted, to see what it will look like....
Not bad at all, looking much better than I anticipated....
Here is shot showing how it looks from an angle....
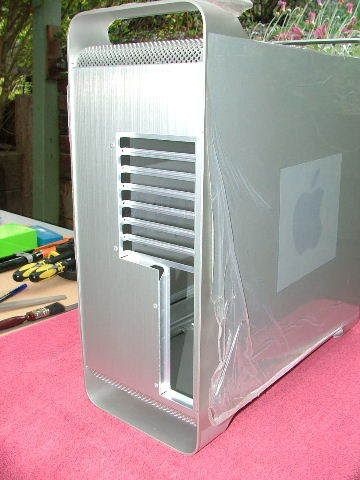
and another angled shot....
and one from dead-on, look at how well it fits in between 2 sidepanels - a near seamless fit, to be honest - lots of carefult filing on this one....
With this part complete, it is onto the 2nd part of the rear cutout.......
Complete, like this......
Not bad at all, looking much better than I anticipated....
Here is shot showing how it looks from an angle....
and another angled shot....
and one from dead-on, look at how well it fits in between 2 sidepanels - a near seamless fit, to be honest - lots of carefult filing on this one....
With this part complete, it is onto the 2nd part of the rear cutout.......
Complete, like this......

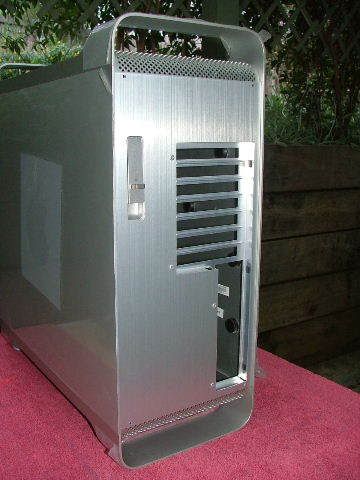
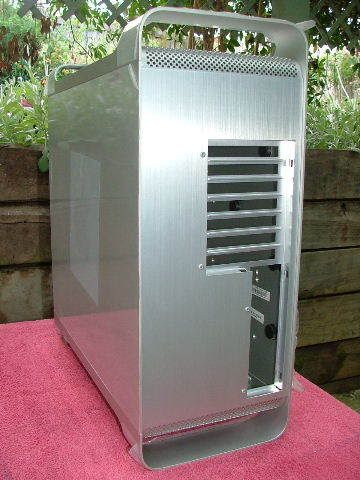
and a final shot for now, from directly behind.....
The pics don't do it justice, it looks factory
Don't worry about PSU relocation (used to be G5 600W unit in bottom of case), I found a very decent pozzie for it, without doing the nasty as all the other G5 modders out there did.
As mentioned a while back, my plan would be to replicate G5 as much as I can, but the case must be easy to work in, must be upgradeabl;e, etc.....and watercooled of course.
Let me know what you think so far.
Br,
MrBean.
geez that is beautiful... it does look factory and cant even imagine how nice in person
Thanx, yes, it does indeed look a lot better in real life, and I want to maintain Apple's quality....
Let's see how the rest will pan out...
GeoFry said:Wait are you planning on having a rear exhaust fan at all then?
and
Cleathco said:I think it would be a good idea to mount one or two 80mm fans on the back. Not only will this give you a bit extra cooling capacity, ir's also closer to the original G5 case, IMO
Well, When I planned the new backplate, I allowed for either 1x120mm, or 2x80mm fans in terms of real estate. Both configurations will fit just fine, with about 7mm to spare.
I was thinking of 1x 120mm, ala Mac Pro, seeing as the system would be watercooled, with 2x 120mm fans cooling the radiator. It is a case of how quiet I want the system, as surely 3x 120mm at 7V will be quieter than 2x 120mm/2x80mm fans in relation.
Thanx for your feedback, and suggestions, it is all good ideas, and in line with what I am planning.
Fans will be very nice aluminium Coolermaster units, to go with the theme. I know there are better options, like Scythe units, I have a few of them, but imho the coolermaster alu fans give me that extra little bit I am hoping for.
Thing is, I won't have any bling eg CCFl/Leds etc in this case, which will break down what I am trying to acheive.
But, let's see where this are all heading, lots to do
Will keep you guys posted.
Br,
Beanie.
Hello Guys,
Ok, what a windy Sunday afternoon in Melbourne.
Anyway, a man must mod, so on we go.
I have designed a new mobo tray to go inside, to fit better with the rear panel I made, and to clean up the inside of the case even better than either Apple's original intention, and my 1st mobo tray creation.
So, herewith the outline of the new tray, I am off to go and do the dremel/filing/drilling etc dirty deed on the unsuspectiing piece of aluminium.
Well, I am quite happy that 1x Lian-Li PC70 sidecover yielded both the new rear i/o-plate, and motherboard tray. Good utilization of the sidecover
Check back later, when I have finished the work on new mobo tray.
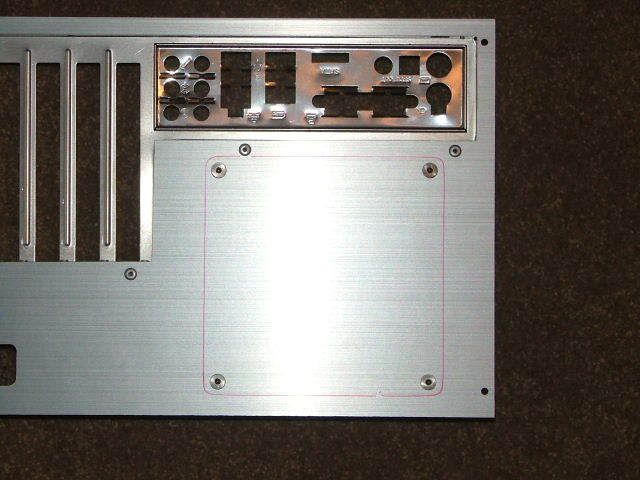
Ok, I have finished the new mobo tray.
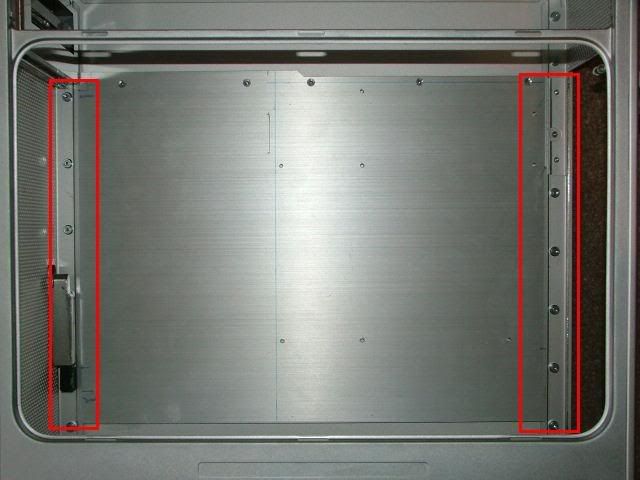
This is the old tray, see the areas marked in red, where the tray stopped short of the sides of the case, not covering the screws etc.....it looked a little non-pro.....
So, I made a new tray, and extended the sides, see blue areas.....it now goes side-side, barely 0.5mm each side from the case - exact;ly what I was looking for, and I anyway had to extend the side on the i/o-plate side, as I need to bolt i/o-plate into the floor of the new mobo tray, to better secure it.
Took me about 2 hours start to completion, a lot easier than rear i/o-plate I made yesterday.
Here is another shot of the tray, somehow my camera struggles to capture aluminium today...pcis seems a little fuzzy, soz....
This cutout will be to clear the G5 front power module.......it has a standoff that is in the way, but necessary, so I needed to do this...
and this one is for the optical drive module, also no way around this one....
That's it for today folks, will keep you posted. Now I can measure holes for motherboard, and get that mounted.
Then smooth-sailing from thereon in
Let me know what you think so far.
Geo Fry said:What do you use to drill the holes?
I have 3 drilling machines, 1x big Pedestal Drill, 1x 750W Bosch Handdrill, and 1x Ryobi 12v Cordless drill - this is what I used to drill the holes with on the mobo tray, as well as the backplate, as the drill is light, easy to handle, and enough torque for small jobs like this.
When I need large(r) holes, eg bigger than say 5mm dia, I will use the Bosch 750W handdrill, even bigger, and for precise drilling, the pedestal machine.....
Hope this helps you a little....
Penguin said:What are you using to cut that aluminum? It's doing a darned good job.
JigSaw
And fine metal files - and a steady hand...hehe
Just a small update tonight, picked up some additional hardware....
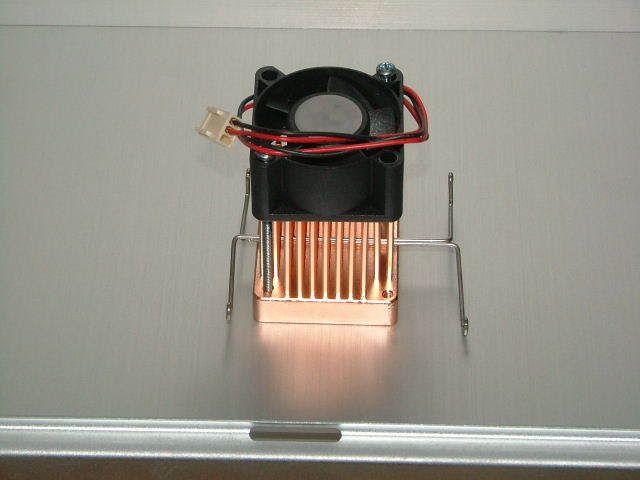
a New Notrhbridge cooler to replace heatpipe on Asus board, which won't work in the reverse installation.....
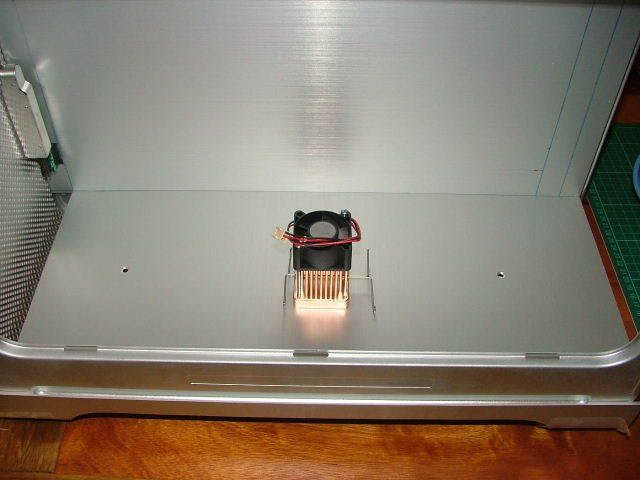
and a close-up shot - it really is a monster copper unit....
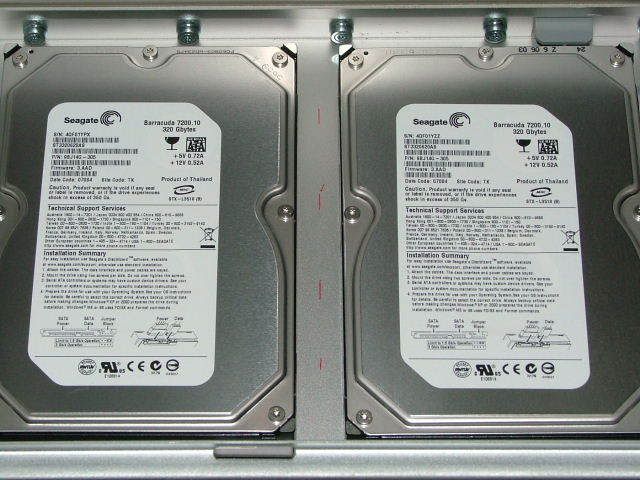
My 2x new Seagate 320gig drives- I was after 2x Raptor 150gig drives, but no stock, and I was not willing to wait, so the Seagates it is....Sata II anyway fast enough in Raid 0 to get close to the Raptor's Sata 1 in Raid 0.
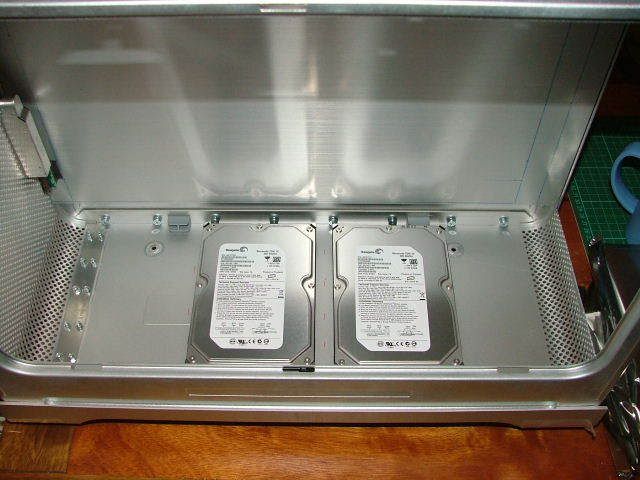
And this is where I will mount them in the case, electronics facing up......here it is wrong way, just imagine flipped over.....
a New Notrhbridge cooler to replace heatpipe on Asus board, which won't work in the reverse installation.....
and a close-up shot - it really is a monster copper unit....
My 2x new Seagate 320gig drives- I was after 2x Raptor 150gig drives, but no stock, and I was not willing to wait, so the Seagates it is....Sata II anyway fast enough in Raid 0 to get close to the Raptor's Sata 1 in Raid 0.
And this is where I will mount them in the case, electronics facing up......here it is wrong way, just imagine flipped over.....
I will make a new bottom plate, as this one is to short, went with my 1st iteration mobo tray, so I will make a new tray, picked up additional alu sheeting this afternoon.....
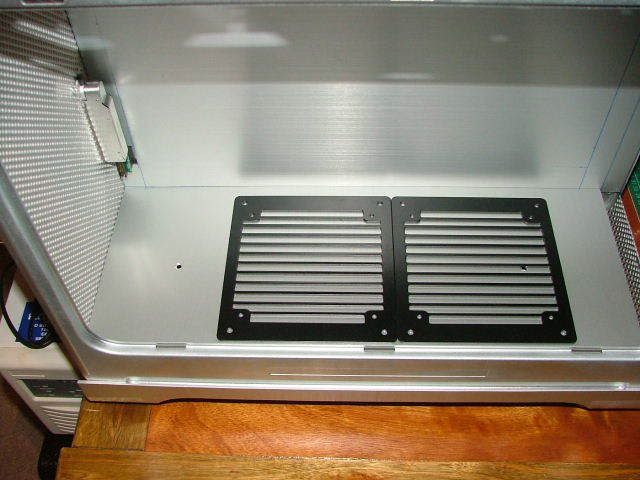
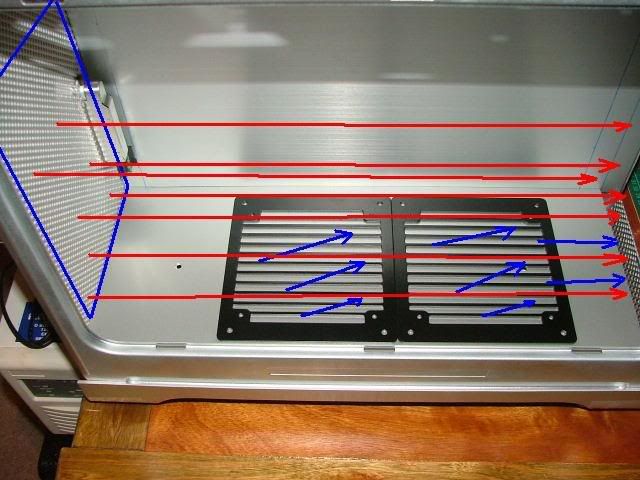
so, how will I cool this harddrives - well, semi-passive......with 2x cutouts in bottom plate to fit these grillz....
Air will be flowing from the rad, ontop of the floorplate - rad will be horizontal...and fan at rear - 1x 120mm mounted in the rear i/o-plate - will scavenge hot air from rad......
At the same time this moving air will create small vacuum at the area immediately below the rillz, causing air movement over harddrives.....which will keep them happy - and remove the need for additional cooling fans.
Maybe this will explain above better:
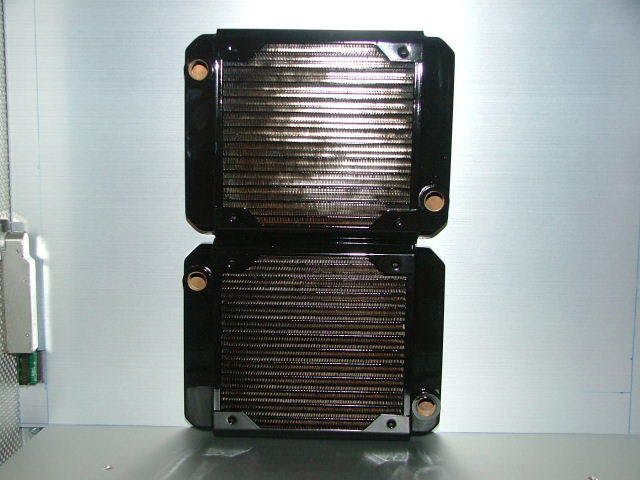
Here is the 2x rads I will be using, one for cpu, other for gfx - or maybe I'll use 2x 120mm Coolwave monster I have, and a single loop. I will play to see which config I want to use, I can go either way, as I have enough hardware....
so, how will I cool this harddrives - well, semi-passive......with 2x cutouts in bottom plate to fit these grillz....
Air will be flowing from the rad, ontop of the floorplate - rad will be horizontal...and fan at rear - 1x 120mm mounted in the rear i/o-plate - will scavenge hot air from rad......
At the same time this moving air will create small vacuum at the area immediately below the rillz, causing air movement over harddrives.....which will keep them happy - and remove the need for additional cooling fans.
Maybe this will explain above better:
Here is the 2x rads I will be using, one for cpu, other for gfx - or maybe I'll use 2x 120mm Coolwave monster I have, and a single loop. I will play to see which config I want to use, I can go either way, as I have enough hardware....
Yesterdays shots were a bit fuzzy, so I took new ones today, after charging camera batteries - they were really flat, and may have caused fuzzy pics - soz about that.
Here is a nice angled shot of cutout at rear, and new mobo tray I made, showing how well it fit into the case....
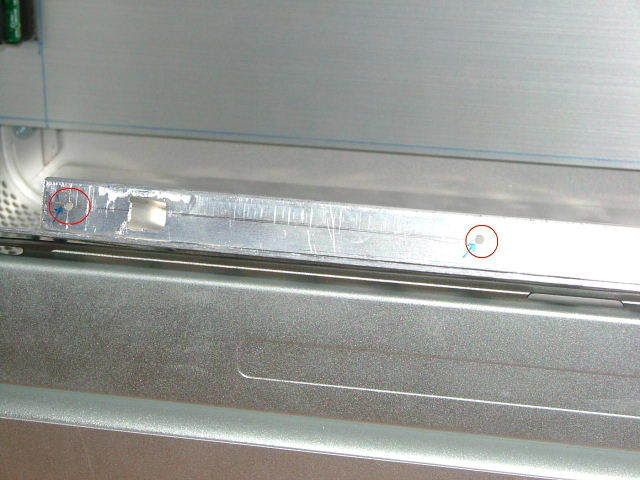
This areas here, marked in red circles - there will be a total of 4, equi-spaced top to bottom of motherboard tray......
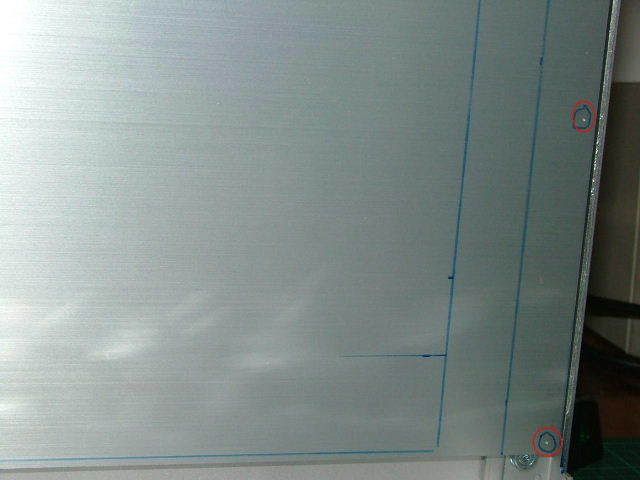
will match to 4 similar holes on the bottom of the i/o-plate, where it mates with motherboard tray, and I will bolt that to the i/o-plate with countersunk allencap screws....this will make it all the more sturdy, and top-quality....pop-rivets on i/o-plate was just for measurement purposes, I will replace them with same stainless countersunk allencap screws - take note this plate is not finished, just raw presentation - need to brush it to obtain same look as rest of alu panels.
Here is a few shots to show the mating of surfaces.......or meshing of corners etc...whichever way you want to call it....
Cutouts for the front panel switch......
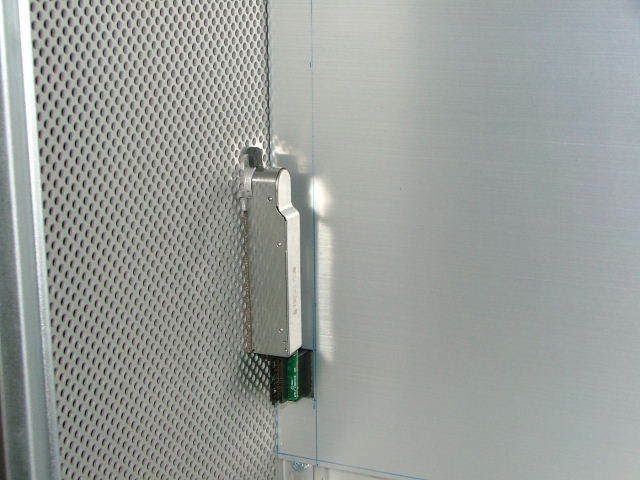
and above to fit underneath optical drive mechanism....
Here is a nice angled shot of cutout at rear, and new mobo tray I made, showing how well it fit into the case....
This areas here, marked in red circles - there will be a total of 4, equi-spaced top to bottom of motherboard tray......
will match to 4 similar holes on the bottom of the i/o-plate, where it mates with motherboard tray, and I will bolt that to the i/o-plate with countersunk allencap screws....this will make it all the more sturdy, and top-quality....pop-rivets on i/o-plate was just for measurement purposes, I will replace them with same stainless countersunk allencap screws - take note this plate is not finished, just raw presentation - need to brush it to obtain same look as rest of alu panels.
Here is a few shots to show the mating of surfaces.......or meshing of corners etc...whichever way you want to call it....
Cutouts for the front panel switch......
and above to fit underneath optical drive mechanism....
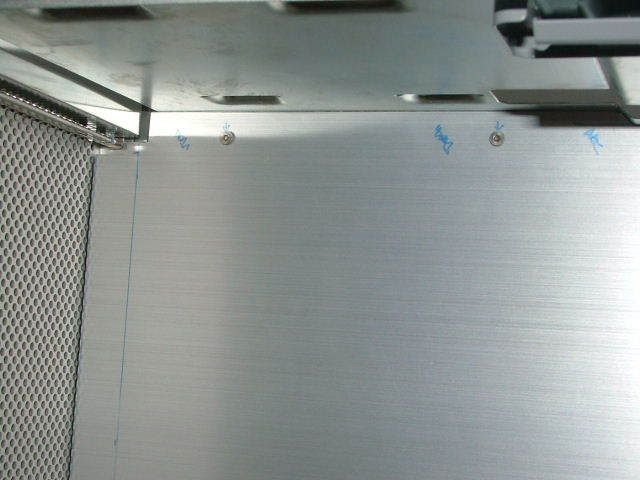
the top rear below where PSU will be located.....
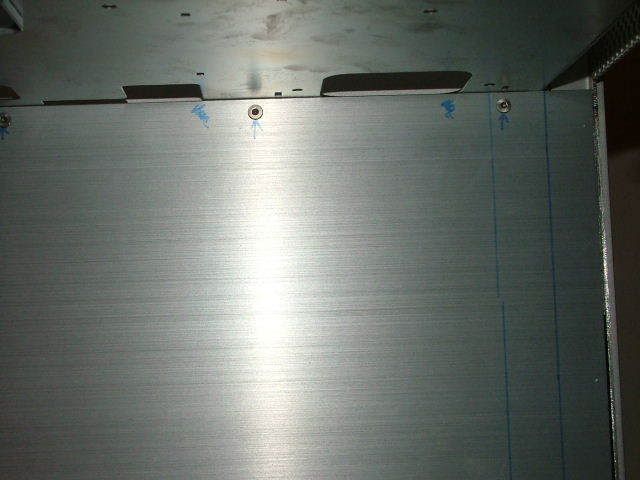
and a clear shot of the new backplate - previous one was a bit unclear....
I will keep you guys posted, will do some big updates on the weekend again.
Feedback would be appreciated.
Kind regards,
Beanie
and a clear shot of the new backplate - previous one was a bit unclear....
I will keep you guys posted, will do some big updates on the weekend again.
Feedback would be appreciated.
Kind regards,
Beanie
Truely awe inspiringly beautiful, but several things:
1. Raptor 150's are sata 3
2. I was thinking, even though that back looks sweet, what about holes drilled, mesh style, for even more factory?
3. Black grilles (are those aqua computer?) in a silver case? Nice, but would be nicer with silver.
Nice screen too.
1. Raptor 150's are sata 3
2. I was thinking, even though that back looks sweet, what about holes drilled, mesh style, for even more factory?
3. Black grilles (are those aqua computer?) in a silver case? Nice, but would be nicer with silver.
Nice screen too.
Bbq said:1. Raptor 150's are sata 3
2. I was thinking, even though that back looks sweet, what about holes drilled, mesh style, for even more factory?
3. Black grilles (are those aqua computer?) in a silver case? Nice, but would be nicer with silver.
Thanx for the feedback - answers to your points below:
1) Raptor 150gig drives make use of the same Sata interface Raptor 74gigs does, eg original Sata interface with 150Mbyte/sec theoretical max transfer speed - Sata II uses faster 300MByte/sec theoretical max - not that any drives are capable of doing that anyway.
2) I was considering that, but would stick with this design - it breaks the monotony of the holes a little.
3) I could not find natural alu colored grillz, so instead got the black units, I will keep them incase, and look for alu-colored ones instead. These won't be visible anyway, or maybe they will, depending what my final plan for the mode will be
Here is the new motherboard bottom tray, or at least the measurements done - this time the donor is a PC65 Lian-Li side panel, PcCasegear ran out of stock on the PC70 ones.....
This one is wide enough with 1mm to spare
Close call, but it has to be 461mm long to match motherboard tray length, which fits exactly the depth of the G5 case. 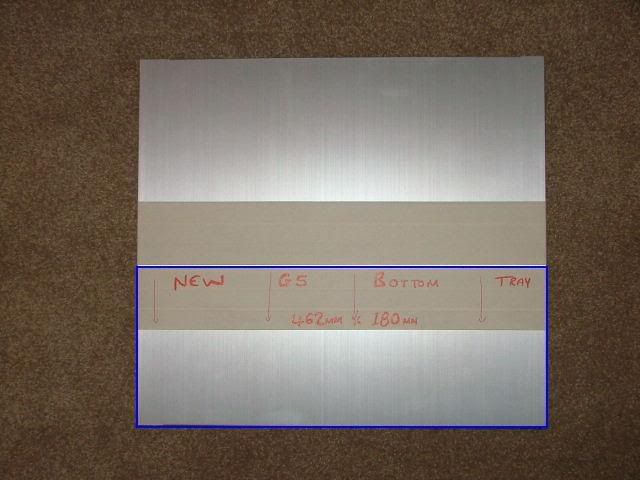
If I have time in the week, I'll cut and file this one, going to be a quickie, in the meantime I will start marking motherboard mounting holes on mobo tray, and a few other odds and ends.
Still a way to go, but it's getting there
I have decided to fit a nice big 120mm Coolermaster Aluminium fan to the rear, instead of 2x 80mm screamers - reason is for much better airflow at lower soundlevels the 120mm vs 2x80mm can provide.
And, it will go well with the same 2x 120mm aluminium fans I will fit to the rad(s).....
Here is the outline marked on the backpanel, and 4x 4mm holes drilled:
From the other side....
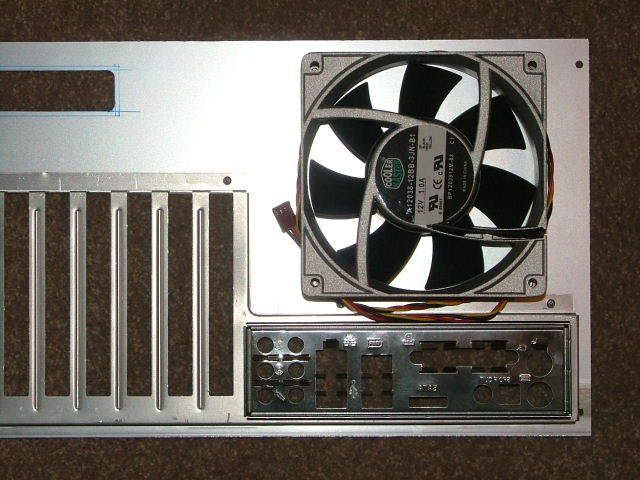
To make sure everything fits together - hehe, don't worry, I took careful measurements....
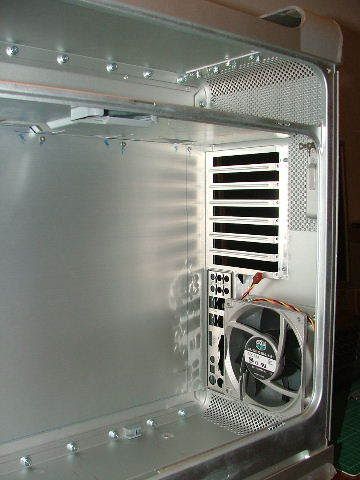
Even the original Apple G5 baffle tray still goes on, without touching the fan - but, about 1/4mm gap
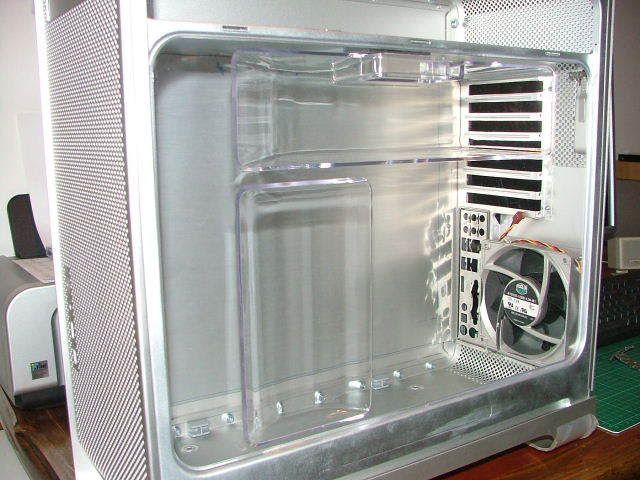
And here's a close-up with the baffle fitted, to show the minute gap.
Take note, I still have to do the fanhole, but havent decided on a std round hole with grill - oh no, not that - or some nice custom hole to fit the theme of the mod...will still make up my mind on that one - for now the fan is in position, and fits where it's supposed to!

And, it will go well with the same 2x 120mm aluminium fans I will fit to the rad(s).....
Here is the outline marked on the backpanel, and 4x 4mm holes drilled:
From the other side....
To make sure everything fits together - hehe, don't worry, I took careful measurements....
Even the original Apple G5 baffle tray still goes on, without touching the fan - but, about 1/4mm gap
And here's a close-up with the baffle fitted, to show the minute gap.
Take note, I still have to do the fanhole, but havent decided on a std round hole with grill - oh no, not that - or some nice custom hole to fit the theme of the mod...will still make up my mind on that one - for now the fan is in position, and fits where it's supposed to!